Showing posts with label recycled crafts. Show all posts

Saturday, March 31

Silly Kids Craft - A-Craft-A-Day with Pattiewack for National Craft Month

I thought it would be fun to end the month on a silly note with these funny spoons I made into monsters!  I love crafting with kids, and I know they will get a kick out of this fun craft.  You probably have everything you need in your craft stash.  But if you need the deets on how to make these, go to iLoveToCreate.com.

I hope you've had as much fun as me during National Craft Month, and that I sparked up a little creativity for you and your friends and family.  
Happy Crafting!
Pattiewack
Craft on!

Saturday, March 10

Recycled Pull-Tab Rings - A Craft A Day with Pattiewack!


Recycled Juice Cap Rings

These rings made from recycled juice caps are just the thing to get girly girls excited about crafting!  And the fact that they have glitter AND crystals is even MORE exciting.
You'll need peel-n-stick sheets, glitter, crystals, and the instructions on the iLoveToCreate website, and all the pull-tabs you can save for this simple and fun craft.

Visit us on Facebook!
Craft on!

Monday, December 19

Recycled Snow Bottles Video - KSEE24 NBC - We Are Fresno Live!


DIY Snow Bottles Video 
as seen on NBC - KSEE24 

Host Stefani Booroojian was so much fun on the LIVE show on Thursday, 

as she shredded foam with a cheese grater 

while I covered recycled bottles 

with Aleene's Tacky Glue.  


You've got to watch and see how easy and cool these bottles turn out, 

and how inexpensive they are for fabulous winter centerpieces. 


Visit us on Facebook!
Craft on!

Thursday, September 30

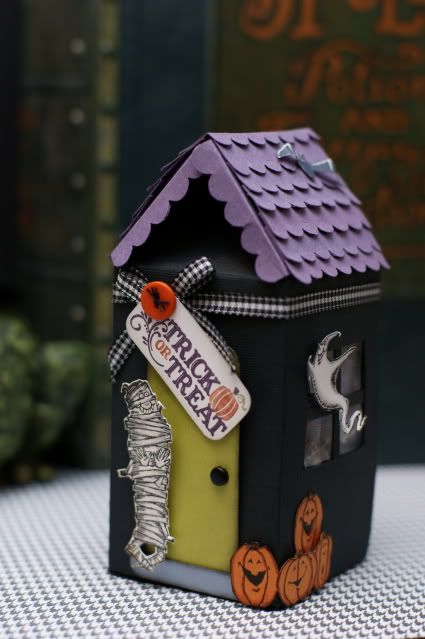
Haunted Milk Carton House


This summer I scored a large bag of Little People for my daughter at the thrift store. Included were animals, knights and Little People dressed in their Halloween costumes. Tallulah has plenty of fun playing with her Little People as is, but I thought why not kick it up a notch and start getting her in the Halloween spirit. We missed the recycling last week so I had cardboard milk cartons starting to pile up and it dawned on me what cute Haunted Houses they would make!


SUPPLIES
Cardboard Milk Carton
Scissors
Paint Brush
Crafty Chica Little Chica Paint Pack
Paint Brush
Sandpaper
Craft Knife
Aleene's Acid Free Tacky Glue
Hambly Overlay
Vintage Photographs
Scrap Booking Paper
Halloween Themed Chip Board
Trim


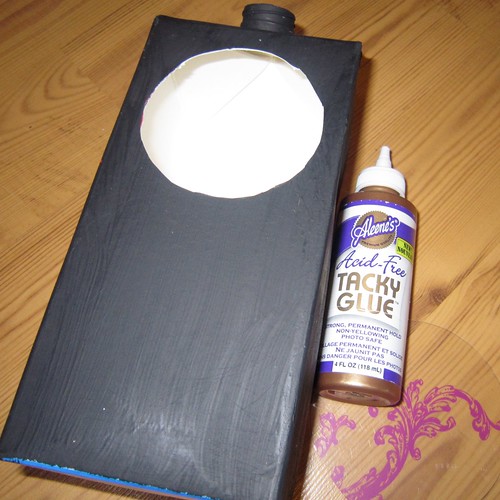
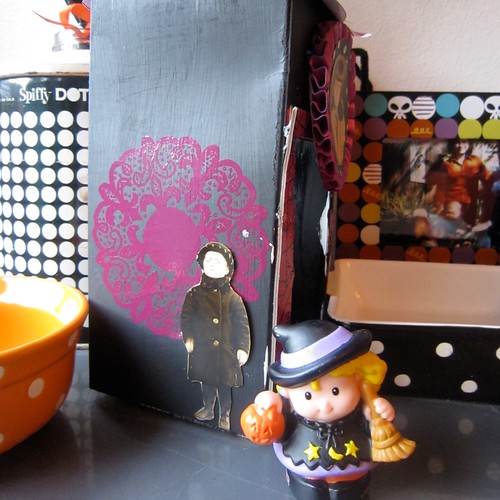
The first thing I needed to do was use sandpaper to get the waxy topcoat off of my milk carton so I could paint it black.


Every haunted house needs a door and a window so your Little People can go inside and play. I used a craft knife to cut out the shapes from my milk carton.


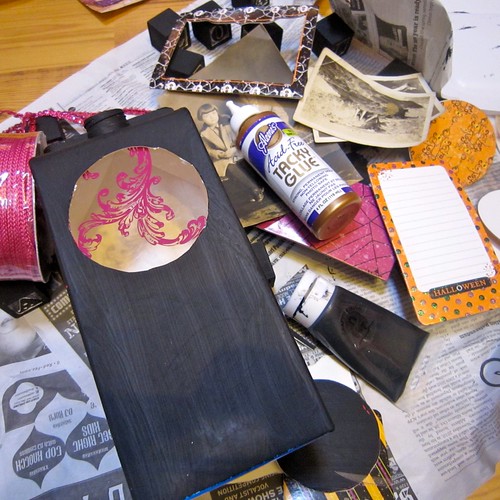
I decided to use Aleene's Tacky Glue to attach a piece of clear Hambly overlay inside my window. From here hot pink and black became my theme.


I decked out my window in sparkly pink trim for a little extra some-somethin'.


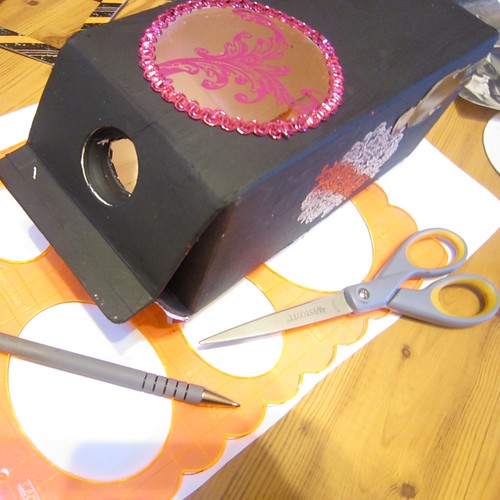
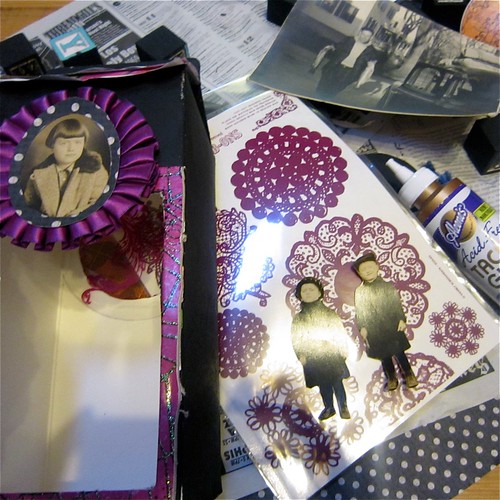
To keep up with the hot pink theme I used some Hambly rub-on's that look like doilies/spider webs on the sides of my haunted house. I used Aleene's Acid Free Tacky Glue to adhere some vintage photographs of children that were kinda creepy.


I used a scalloped edge template and scissors to cut out paper shingles for the roof of my haunted house. I used Aleene's Tacky Glue to attach alternating strips of paper.


I added a few last minute frills like chipboard around the door and a rosette with another creepy kid over the door.

Seems like a lot of work, but actually a milk carton was transformed into a creepy casa in a couple of hours and most of that was paint and glue drying time.


All that is left to do is bust out the Little People and the haunted house is ready for action!

Have some extra milk cartons lying around? Check out these other crafty up-cycled options!

Halloween Cartons by Stampin Addicts


Halloween House by Little Lovely


Haunted Milk Carton by The Little Room

Craft on!Click here for today's daily giveaway!

Monday, September 27

DIY Russian Nesting Doll Purse + Enter to Win it!


Check out this video of designer Cheryl Ball and this fabulous Russian Nesting Doll purse she made for a past issue of Haute Handbags! Cheryl tells us how she made this cute bag (you won't believe what it's made out of! All it took was a little ingenuity, Aleene's Fabric Fusion, and fun glitter and accents!

And today, September 27th, 2010, enter to win this amazing purse on ilovetocreate.com to show off with your outfit or display! It is a definite conversation piece!! Click here to win in our daily giveaway!

Friday, April 9

Paper Bag Flowers


This is one of the projects we're making tonight as a warm-up to the rest of the workshops. It's very easy and is great for Earth Day coming up, as well as a corsage for Mother's Day!

These flower pins are made from paper grocery bags!

Supplies:
Brown paper bags
Crafty Chica® Little Chica Paint Packs™
Crafty Chica® Glossy Gloss Varnish™
Crafty Chica® Chunky Glitters™
Scissors
Paintbrush
Charm for the center
Brad
Small hole puncher
Hot glue
Optional: rubber stamps, ink pads, markers

Directions: Cut three sizes of circles from the paper bag. I cut mine in 5", 4" and 3" round. Water down the paints to a light wash and coat over the circles. Let dry. Decorate the circles with rubber stamps or doodles, or leave as is. Punch two holes in the center and stack them. They will be flexible, so fold and crinkle them to your liking. If they are too loose, add a drop of glue in the center to hold them in place. Coat the edges of each circle with varnish and add the glitter. Shake off excess. hot glue charm in the center, add a pin back, or glue to the top of a gift, etc...

Peace, love, and glitter!
Kathy :-)

Sunday, March 28

Sock it to me Owls


Sock it to me Owls
by Cheryl Ball

Materials:
Aleene's® Fabric Fusion® Permanent Dry Cleanable Fabric Adhesive
Tulip® 3D Fashion Paint™ in Pink
– Stick
– Rice
– Kids socks: assorted sizes
– Paper towels
–Needle and thread to match
– Buttons: ½” (2) per owl in desired color
– Clothespins
– Raffia
– Sewing pins
– Jute for hanger, 2 yards
– Masking tape, low tack
– Scissors

Instructions:
1. For body, cut across sock, just under heel, using scissors.
2. Pin forehead, beak and wing patterns onto ribbing of socks. Cut out.
3. To create ears, glue two scrap sections of socks together. Let dry. Cut out ear shapes.
4. Fill body section with rice to within 1-1/2” from top. Pinch in sides and apply a dot of glue in pinch to hold in place. Hold with clothespins until dry. Fold excess to back, applying glue on back of flap and press in place creating head of owl. Hold with clothespins until dry.
5. Thread needle with contrasting thread to buttons. Sew a few times in holes of buttons. Tie knots at back of button then trim ends.
6. Apply glue to back of forehead triangle, smooth with finger to edges then press in place slightly above fold of body. Apply a thin bead of glue along bottom of edge of ear then press in place on back of forehead holding in place with tape if needed until dry.
7. Glue buttons, beak and wings in place. Let dry.
8. Start flow of Pink Slick Paint on paper towel using an even pressure on bottle for a smooth line. Lay owls on back and flatten. Paint semi-circles on sock to create look of feathers. Let dry.
9. Cut a stiff branch with several branches. If needed, several smaller branches can be tied together with raffia to create a wider area for owls to sit on.
10. Position owls on branch then remove and apply a thick bead of glue in place. Replace owl and press into glue. Repeat with other owl. Let dry.
11. Tie a knot with raffia on one side of branch; determine length of hanger then tie knot on other side. Hold up to see if it hangs straight, if not add another length of raffia and knot at top.

Sunday, March 21

Recycle, Reorganize, Recipes


Love to cook, love to organize, and love to decoupage....
so I love this decoupaged recipe tin I made to organize my fave recipes to keep right on the counter top in my kitchen.


I'm a big coffee and hot tea lover and I just can't bear to throw away some of the cool packaging and save them in an ephemera box I keep in my studio. The maple syrup and the chocolate label were tucked away there, too. The cute alphabet caps were in my scrapbooking stash.

I started out with a humdrum recycled tin from the thrift store. It would have been fine the way that it is, but who you have to agree, it's pretty darn boring.

Then I used Aleene's® Collage Pauge Instant Decoupage to glue the labels to the tin. I laid the labels face down on a paper towel, brushed glue on the back and then applied them to the tin, pushing out any air bubbles. When I was finished with that step, I put a coat of glue over the labels to keep my tin nice & clean from flying food.


Recipe cards were a snap to make with colored card stock, clippings from magazines and the web, and glued together with Aleene’s® Acid Free Tacky Glue™ Sticks.
The whole project didn't take very long, and more recipes can be added all the time.


This project, and dozens more were designed by me and written up by Barbara Winkler in "Cookbooking, the delicious new way to scrapbook" by Sterling Publishing. You can pick yours up at Barnes & Noble or online.

Oh, and here's my recipe from the pic. I like to make this for my gal pals on the weekend.

Grapefruit Pomegranate Sunrise:
4oz. Light Rum (optional)
16 oz. Pink Grapefruit Juice
2 oz. Pomegranate Juice
2 oz. Ginger Ale
4 Wedges Ruby Red Grapefruit

Pour ingredients into a tall glass pitcher. Pop a dozen ice cubes into the pitcher. Stir briskly. Serve in champagne flutes with crushed ice and a garnish of grapefruit wedges. Enjoy!

Happy Cooking and Crafting!
PattieWack

Wednesday, March 17

Canned Creativity Soda Can Frames


Save those soda and energy drink cans from the recycling bin! Turn them into wacky accents for family picture frames with Aleene’s® Original Tacky Glue Sticks.

Materials:
Liquid Fusion™ Clear Urethane Glue
Aleene's® Original Tacky Glue Sticks
– Low-tack masking tape
– Paper towels
– Old jewelry pieces
– Wire cutters
– Scissors
– Cardstock – colors to match
– Chains
– Permanent felt pen
– Pushpin
– Assorted beverage cans
– Clear plastic frames
– Scissors
– Cotton swab
– pattern (click here for pattern)

Instructions:
1. Wash cans then set upside down on paper towel to drain excess water.

2. Use scissors to carefully cut top and bottoms from cans then cut down one side and smooth out for a flat piece of metal. Caution: the cut edges of cans are very sharp.

3. Dry any remaining water if needed, then cut out names or designs from front of cans.

4. Cut out patterns from pattern sheet. Use felt pen to trace design on inside of can, determining color for each. Carefully cut out sections.

5. Bend metal as needed to create flattest surface possible.

6. Measure and cut cardstock to fit inside frame. Use an Original Tacky Glue Stick to add layers of paper and pictures together. Insert into frame.

7. Position metal pieces where desired. Use pushpin to lightly score back of metal pieces and section of frame where they will be placed. Apply a thin layer of glue in back center of each metal piece then use finger to smooth glue close to edges. Press piece in place, then add small pieces of low-tack masking tape to hold in place till dry. Any wet glue can we wiped away with a damp cotton swab. Glue all pieces in place. Let dry over night then carefully remove all tape.

8. Chain frame: Add a thin layer of glue in a circle on front of frame. Starting at center, hold chain up then let end lay in center of glue. Start swirling chain to fill circle. Cut off excess with wire cutters and let dry. Repeat step to create number of circles desired. Cut off any excess parts on back of jewelry piece so it sits flat. Cut several lengths of chain so they can be layered as shown. Glue ends of outside chain to top of frame, holding ends with tape. Glue other two sections in place. Let dry, remove tape then glue jewelry piece in place; hold with tape until dry.
Clicky Web Analytics
Pin It button on image hover

Subscribe to our newsletter

* indicates required
I am interested in products and inspiration for...
Close