Thursday, June 25
Friday, June 27
How To No Sew 4th of July bandana pocket
Tuesday, June 24
DIY 4th of July Inspired Hat
DIY: Distressed Flag T-shirt
Thursday, June 19
Dip Dyed 4th of July Footwear
Wednesday, June 26
DIY American Flag-Inspired Shorts
Thursday, June 28
4th of July Bomb Pop Shirt
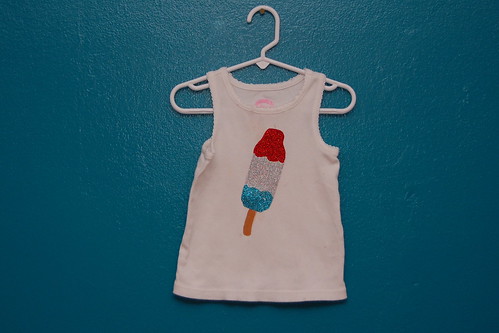
Nothing says 4th of July like a Bomb Pop. Well ok maybe fireworks say it more, but Bomb Pops are cuter. I mean come on. Add glitter to the yummy equation and then pop this top on my kid and the cuteness will be unstoppable. Let me tell you how you can make your own in about 20 minutes.
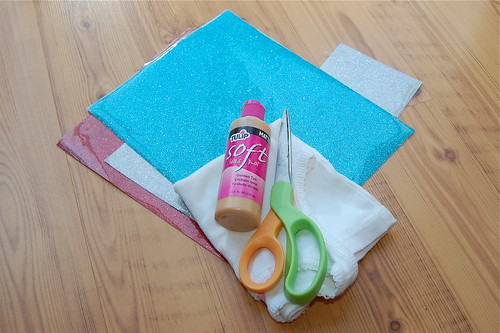
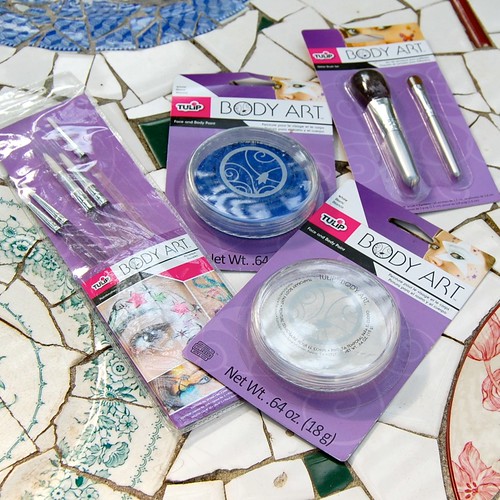
SUPPLIES
T-Shirt
Tulip Fabric Paint (the shad of a stick)
Paint Brush
Iron
Tulip Fashion Glitter Shimmer Sheets
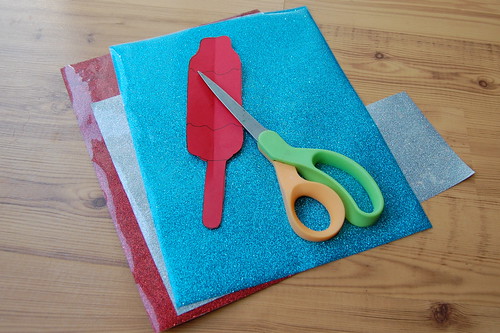
First I drew a picture of a Bomb Pop on a piece of paper to use as my pattern.
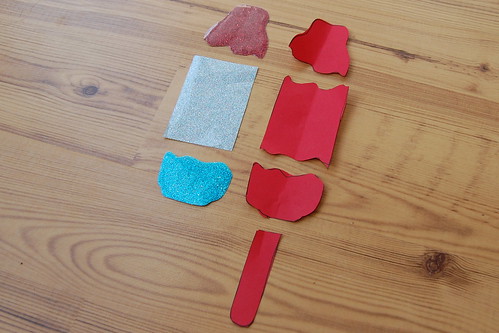
Next I cut my pattern into 3 parts. I then used the pattern parts to cut the shapes out of silver, teal and red Shimmer Sheets.
Once my shapes were cut out I placed them on my shirt where I wanted. Place a thin piece of fabric on top of the image and using a hot iron press.
The last thing to do is to paint on a popsicle stick and let it dry. I can't wait to show Tallulah her new spiffy 4th of July Bomb Pop shirt when she gets up tomorrow.
***This is a sponsored post by I Love to Create - I was compensated & given free supplies. Mama has gotta pay the bills somehow and really who in their right mind would say no to free craft supplies***
Tuesday, June 26
4th of July Platter - and a Sprinkles Cupcake Giftcard Giveaway!
![]() |
| 4th of July cupcakes courtesy of Sprinkles. |
You'll need to select some Duncan bisque, I went with an oblong platter and a large square one. And then you'll need Duncan Concepts Underglazes in red, white and blue. Brushes and Pure Brilliance Glaze are needed too. You can find all the product details here.
Base coat your platters as desired. I went with all white for one of them, and red and blue for the other. The contrast is nice once they are fired, they'll compliment each other!
I used thin tape down the center of the platter and then used a Tulip Sponge Pouncer to create dots. For the outside, I used the tip of the paintbrush and made a hecka lot of polka dots!
For the second platter, I used a Tulip Flexible Stencil and applied white paint with the pouncer. When you're finished, coat with two layers of Pure Brilliance and then fire at Cone 6.
Thursday, July 7
Nothing Says Happy Birthday America Like Patriotic Face Paint

I hope you had a wondermous 4th of July that included lot's of watermelon and listening to "Proud to be an American" by Lee Greenwood at least once. Really, what is the 4th without Lee. Anyway... I spent the holiday with my parent's in my home town of McKinney, TX. In keeping with the quaint small town feel of things around here there was a 4th of July parade on the square that we attended. There were mini flags to wave, classic cars to look at, horses that pooped in front of us and face paint. Nothing says Happy Birthday America like patriotic face paint.

Sure I could have paid $5 bucks to have Tallulah's face painted at the parade, but why when I could do it myself with Tulip Body Art. The line comes in every color under the rainbow including red, white and blue. There are also body glitters, spray on tattoos, stencils and oodles more to play with.

I enlisted the help of my mom to paint a pair of stars on Tallulah's cheeks for the parade. All you do is mix the paint with a bit of water and it goes on really smooth. There is even a line of body paint paint brushes. I was super happy that the paint came off really easy with rubbing alcohol and didn't stain Tallulah's skin.

I know, I know 4th of July is 360 something days away, but let us not forget that Halloween is right around the corner. I'm thinking I might go as a Tretchikoff's painting, so I'm stocking up on green body paint. Plus, who needs a holiday for face paint. Tallulah has a birthday party to attend this week and I'm thinking of busting them out for fun. Rainy day with nothing to do, face paint. Feel like listening to Kiss in full face paint regalia, you can make it happen. Face paint is the kind of thing every mother should have in their arsenal of kiddlet entertainment options. I was sure glad this 4th of July that I did.

Visit us on Facebook!
Craft on! Click here for today's daily giveaway!
Tuesday, June 22
Star-Spangled Shirt


The 4th of July just wouldn't be complete without a red, white and blue outfit. This cute t-shirt was super simple and you can have it ready to wear in about an hour!
Grab your red and blue Tulip Fashion Spray and a t-shirt and a white bandanna. Cover your table with plastic before you get going. Next, lay the shirt on the table and pinch the bottom of the shirt into fan folds, and scrunch the top of the shirt. This will make it look like stars and stripes when you're done.
Now, spray red on the bottom of the shirt and blue on the top. Do the same thing to the bandanna. Wait until they're dry and then flip them over to do the back. Let them dry completely, and you're ready to add a cute denim skirt or shorts. The bandanna is cute around your neck but it would look really adorable around a ponytail, too.
All you need now is a sparkler in one hand, and a piece of apple pie in the other!
Happy 4th Everybody!
Pattiewack
Monday, June 21
Starlight Luminaries Mason Jar DIY

After the fireworks show, light up the night with your creativity! These Starlight Luminaries make the perfect outdoor accent! Dress up old jars with colorful tissue paper and ribbons glued on with Collage Pauge Instant Decoupage™; hang them outdoors for décor that’ll have everyone in the holiday spirit!
Starlight Luminaries
Designed and Decorated by Cheryl Ball
Materials
– Tulip® 3D Fashion Paint™ in 65088 Gold
– Collage Pauge® Instant Decoupage
– Aleene’s® Quick Dry Tacky Glue™
– Foil
– Wire
– Scissors
– Wax paper
– Tissue paper or light cardstock, red, white, & blue
– Glass mason jars
– Plastic
Instructions
1. Protect work surface with plastic bag or paper. Cover immediate area where the jars will be with wax paper.
2. Wash and dry jars.
3. Cut or tear larger pieces of white tissue paper. Cut red and blue tissue paper into strips or stars. Cut enough to wrap around jars.
4. Pour the Matte Collage Pauge Instant Decoupage™ onto foil. Brush onto the jar working on one area at a time. Place white tissue paper onto the jar and brush decoupage onto top of paper. Wet finger in the decoupage and flatten the paper working out any wrinkles or bubbles and make sure the paper is secure all the way around to the back. Cover the whole jar with white tissue in this manner.
5. Choose a strip of red or piece of blue. Apply to the jar in the same method described above but placing so that you achieve the stars or stripes designs. Let dry.
6. Embellish with Tulip® 3D Fashion Paint Gold Glitter.
7. Wrap top of jar with wire to hang.
8. Using the Aleene's® Quick Dry Tacky Glue™, glue on ribbon around jar and at top.
Here's another great design example!

Happy crafting!


