Break out the glitter and glue and give your humdrum heels a star-studded makeover! Here are some ideas we've whipped up for you. Enjoy!
Craft on! Click here for today's daily giveaway!

Tuesday, November 30
Monday, November 29
New Holiday Craft Videos!

We had so much fun with Holiday Craft Videos last year,
our iLoveToCreate website team decided to do them again this year!

Scott decided that a white Christmas would be fun, so he got busy painting and
I brought in some color with ornaments and pillows.
The cute little red deer and the
iLoveToCreate frame was added by Alexa (aka Swell Designer.)
iLoveToCreate frame was added by Alexa (aka Swell Designer.)

We have tons of Tulip holiday products,
so it didn't take long to put together some really
cute and quick crafts for the videos,
including coffee cozies with crystals to make a monogram.
so it didn't take long to put together some really
cute and quick crafts for the videos,
including coffee cozies with crystals to make a monogram.

Molly was on hand to assist with set-up.
That cute apron was just one of several darling ideas for using our
amazing adhesives, crystals, 3-D paint, stencils and glitter.
That cute apron was just one of several darling ideas for using our
amazing adhesives, crystals, 3-D paint, stencils and glitter.

As you can see... Victoria was not so excited about me
snapping a candid photo of her during the shoot.
Sorry!

And of course, Scott worked to make me look good, the audio sound wonderful,
and get those all-important close-ups for you to see
how to make your quick holiday crafts.

It was a good day of shooting at the iLoveToCreate photography/production studio.
Keep coming back to check out the videos as we post them here on the iLTC blog.
Keep coming back to check out the videos as we post them here on the iLTC blog.
I hope you like the videos, and that they will inspire you
to be creative this holiday season!
to be creative this holiday season!
Happy Holidays!
Craft on! Click here for today's daily giveaway!
Friday, November 26
Why you ALWAYS should have a pack of Tulip Soft Paints ready to go...

My nana is 92, and today I am taking her to a funeral (one of her favorite cousins passed away at 94 this week). Nana has a pair of silver shoes that she considers to be the comfiest ever. But she needs black comfy shoes to wear to the services. Last night while visiting her after Thanksgiving dinner, she asked me if I could paint her beloved metallic slip-ons when I got home so she could wear them in the morning.
"Of course!" I replied. I love it when family members ask me for crafty assistance!
These shoes are soft metallic vinyl. In case you are wondering, shoe polish is stinky. Spray paint rubs/flakes off, but Tulip® Soft Fabric Paint™ ? This is one of the reasons it was invented!


My suggestion - especially with the holiday season here - is to buy a multi-pack so you have little pots of different colors. They'll come in handy to touch-up belts, handbags, furniture, shoes, clothing and more.
 |
| Here is Nana applying some lipstick. Yes, she is using a purse mirror I made for her twenty years ago, she still uses it daily! I love my nana! |

Craft on! Click here for today's daily giveaway!
Thursday, November 25
Cute Quilted Kiddo Coat

I know, I know two weeks in a row of kid's clothing - but can you really have enough? I have spent the week with my mother who has recently visited The Houston International Quilt Show, so she was busting with ideas. One of those fabulous ideas I decided to share with you today for I Love to Create.
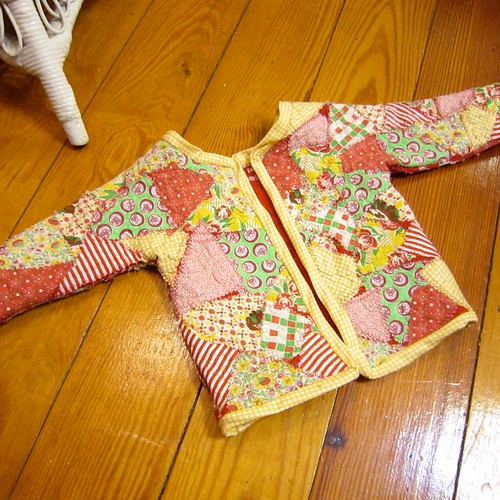
I love the look of patchwork crazy quilts so when my mom told me about this adorable jacket she had seen made at the quilt show I was totally on board. Grab some fabric scraps and let's get busy.

SUPPLIES
Fabric Scraps
Pinking Shears
Sewing Machine
Sweat Shirt
Scissors
Aleene's No-Sew Fabric Glue
Iron
Pins
Thread
Velcro
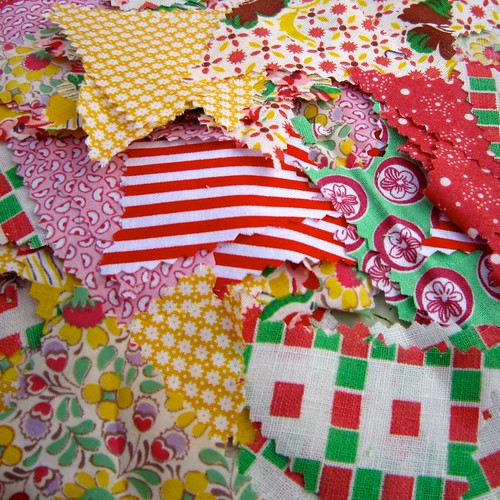
TAKE ME DOWN TO THE TRIANGLE CITY
Scalene, isosceles, right - whatever kind of triangle floats your boat. I used my pinking shears and vintage feed sack fabric to cut a pile of different triangles. If you don't have feed sack light-weight quilting fabric works like a charm.
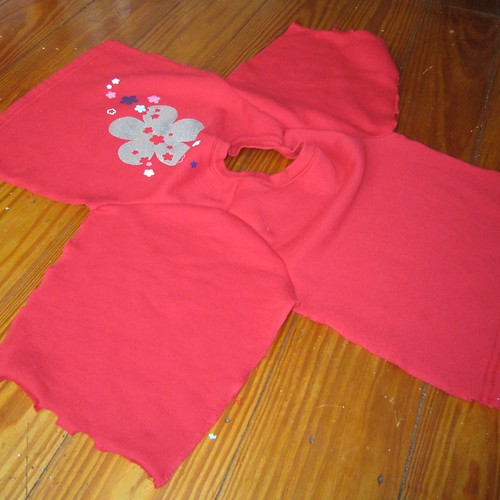
SWEATSHIRT DECONSTRUCTION
Next you are going to cut your sweat shirt up. Cut up the side seams and continue up the sleeves. Cut the cuffs and if there is a ribbed bottom cut that off as well.

PATCHWORK PARTY
Using your Aleene's No-Sew Fabric Glue place your triangles in a random pattern all over the sweatshirt. It's ok if there is a little sweatshirt peeking between the triangles. The glue will wash out, but hold your triangles in place long enough to stitch them on.
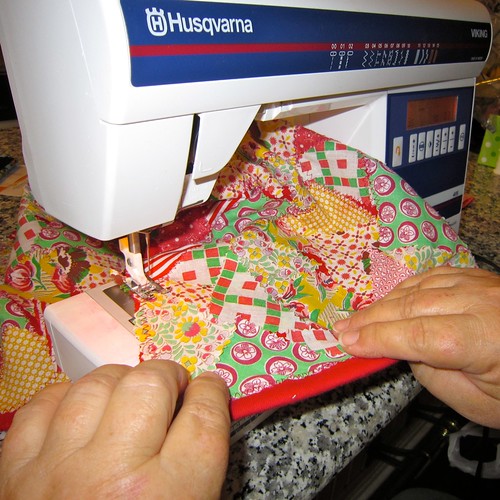
ZIG-A-ZAG-DO-DA-ZIG-A-DEE-A
Using a zig zag stitch on your sewing machine and a contrasting thread sew all the edges of all your triangles down. Also stitch around all the edges.

LOOK MA, I'M QUILTING
Place your jacket on the sewing machine. Drop your feed dogs and using a straight stitch on your machine free quilt all over you jacket. The more random the better.

GRAB YOUR SCISSORS
Cut the ribbed neck out of your sweatshirt and cut your sweatshirt up the front.

PUT THE SWEATSHIRT BACK TOGETHER AGAIN
Pin your sweatshirt back together and using a straight stitch put it back together again. Using bias tape (we made our own) trim the edges of your jacket.
I have to give my mom the infamous Fredda Perkins most of the credit for this adorable jacket. Grandma comes to the crafty rescue yet again! I kinda want an adult size version of this jacket for me.
Craft on!Click here for today's daily giveaway!
Wednesday, November 24
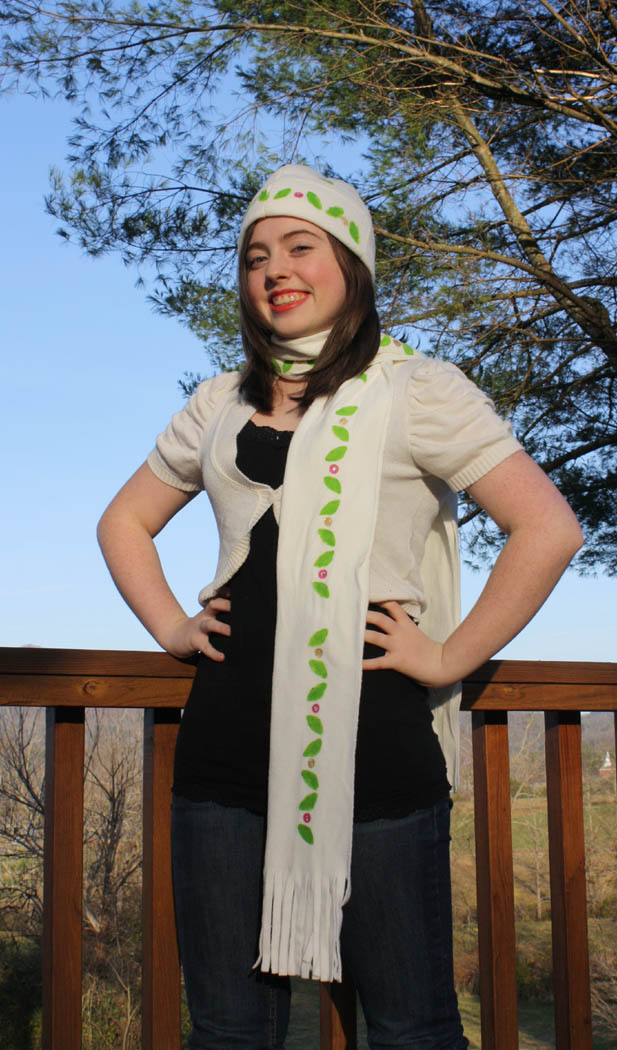
ILove toCreate Teen Crafts: Snow Bunny Holiday Scarf and Hat Set

Snow Bunny Holiday Scarf and Hat Set
Avalon Potter for ILoveToCreate Teen Crafts

Winter is coming fast and I made this scarf to keep me warm during the holidays. I had a lot of fun making this and I think you will too. This goes perfectly with any type of coat and is a breeze to create. I hope you enjoy and until next time wishing you and yours a Happy Thanksgiving.
Happy Crafting,
Avalon
Materials
Fleece hat and scarf in cream (I got mine at Old Navy)
Tulip Glam-it-Up Crystals Clear
Holiday Themed Stencils (Try The Holly Stencil from Tulip!)
Tulip Fashion Graffit Paint Taggers in Green and Pink
Tulip Dimensional Fabric Paint in Gold Glitter
Tulip Foam Sponge Pouncers
Aleene's Jewel-It Glue
1. Fold scarf in half and lay flat.
2. Apply stencil pattern on scarf using a paint pouncer. The leaves should be green and berries alternate between pink and gold glitter.
3. Add crystals to each pink berry using Aleene’s Jewel-It Glue.
4. Decorate the brim of your hat in the same pattern, adding a leaf and berry to each panel at the top as in photo. Decorate front and back of hat.
5. Allow to dry before wearing!
Winter Wonder Gift Tote
 |
| By Cheryl Ball for ilovetoCreate |
Wrap that special gift in packaging that’s just as fabulous! Stitch felt into a candy-colored tote then add wintery accents with Tulip® 3D Fashion Paint™ for a gift bag that looks so good, no one will care about what’s inside!
Materials List
- Tulip® 3D Fashion Paint™

65000 White 
65109 Pink -
Miscellaneous
- Tracing paper
- (1) Button –1” white
- Permanent felt pen
- White chalk – sharpened to a point
- Foil
- Sewing machine with matching thread
- Embroidery floss – white
- Sewing pins
- Pencil
- Needle with large eye
- Scissors
- Self-adhesive shelf paper
- Paper towels
- Plastic knife
- Felt yardage – pink, red – ½ yard each
-
Patterns
Instructions
- Enlarge bag pattern to 14” from handle to base and 12” at widest part, then draw in hole for handle. Cut an oval base for bag that’s 8 ½” x 4 ½”.
- Pin tote and base pattern onto double layer of red felt then cut out. Repeat on a double layer of pink felt.
- Layer and pin together pink and red felt pieces with red facing outward. Sew a ¼” seam along top edge and around inside handle on both sections. Trim seams if necessary to even out.
- Pin sides together then sew along edges.
- Thread a needle with three strands of white embroidery floss then tie a knot in ends, creating six strands. Whip stitch around sides, inside handle and along top edge.
- Use pencil to trace triangle pattern design onto tracing paper, then trace five more, equally spacing to create snowflake as shown.
- Place shelf paper shiny side up over pattern then use felt pen to trace design onto shelf paper. To create stencil, carefully cut out inside of each section, leaving outside edges intact.
- Position stencil on tote, press to secure then run a finger along inside cut edges to prevent paint seepage.
- Squeeze a puddle of Pink Slick 3D Fashion Paint onto foil. Use knife to spread paint into each section of design, leaving an even coat. Carefully remove stencil and let dry.
- Trace other design onto tracing paper. Flip pattern over then use chalk to trace over lines. Position design between each painted section on bag then run a finger along lines, transferring design in chalk onto bag. Repeat steps, retracing design with more chalk as needed.
- Start flow of White Slick on paper towel, using an even pressure on bottle for a smooth line. Trace over design lines with White Slick. Add pink dots with a white dot in center where shown. Squeeze a dot of Pink Slick at center of snowflake design then press button into paint. Refer to photo. Let dry.
- Pin bottom sections in place then whip stitch along edges.
Tuesday, November 23
Golden Girl Bracelet
 |
| Designed by Allee Marderosian for iLoveToCreate |
When it comes to accessories, go for the gold! Turn an ordinary bangle into an ultra girly accent with gold ribbon and lace, and a little help from Aleene’s® adhesives.
Materials List
- Aleene's® Fabric Fusion® Permanent Dry Cleanable Fabric Adhesive
- Aleene’s® Crystal Clear Tacky Spray™
-
Miscellaneous
- Newspaper
- Clip
- Gold lace – ½ yard
- Wood bangle
- Gold ribbon – 2 yards
Instructions
- Squeeze a dot of Fabric Fusion on inside area of bangle then place end of ribbon in glue. Wrap gold ribbon tightly around bangle, overlapping edges so bangle is completely covered.
- Squeeze a dot of Fabric Fusion at stopping point (on the inside of bangle) then press end of ribbon into glue and use clip to hold ribbon in place while glue sets.
- Cut up random pieces of gold lace.
- Lay down newspaper in a well-ventilated area and place lace pieces on newspaper.
- Spray Crystal Clear Tacky Spray onto lace pieces then place pieces sticky side down onto bangle, wrapping around edges as shown. Let dry completely.
Monday, November 22
Softie Headband (with T-shirt Scraps!)

Yes, Thanksgiving is nearly here, but I'm already fast forwarding straight past the food coma to the holiday parties! And there is really nothing like a bit of proper party headgear to make a grand entrance. Bring in bright tones to battle the cold weather--or, ooh! add glitter to your project to really sparkle in the season!

Materials:
-1"-wide T-shirt strips of varying lengths (in complementary shades)
-Aleene's Fabric Fusion Permanent Dry Cleanable Fabric Adhesive
-fabric scissors
-1 fabric-coated plain headband (preferably with a metal base)
-clothespins
-straight pins (optional)

Select one T-shirt strip (a T-shirt hem works well -- just cut off the stitching and stretch it out), squeeze a dab of Fabric Fusion on the inside end and fold it over on itself.

Gently squeeze more glue around the outside of the fold and coil more fabric into the glue.

Continue gluing and coiling until you have a 1" to 1.5" fabric disc. Then snip the end at an angle and apply a bit of extra Fabric Fusion to make sure it flattens against the edge of the disc.

Repeat to make seven to nine more discs! Optional: Use straight pins to keep the ends of the coils in place while they dry.

Arrange the discs in a pattern you like and glue them together where they touch. Let the panel dry.

Apply glue along the top edge of the headband and gently press the panel of coils against the headband.

Clip it in place with clothespins (so you don't have to hold it). Let it dry.

Wear it hair up or down!

Craft on! Click here for today's daily giveaway!
PATTIE WACK VIDEO: Dazzling Dessert Cover!
OK, the holiday season doesn't officially kick off until Friday, but here at iLoveToCreate, we cannot wait for the red and green glitter to fly! So here is a little jump start on the season!
LINK
Check out our new Facebook page and give us some LIKEy love!!
Craft on! Click here for today's daily giveaway!
LINK
Check out our new Facebook page and give us some LIKEy love!!
Craft on! Click here for today's daily giveaway!
Pompom Turkey Favor


When I think of Thanksgiving, I think of Scott and I waking up and
having a lazy breakfast before the dinner prep begins.
So, I thought a cute little pompom turkey sitting on top of upside
down coffee cups at our table would be just the
perfect favor to start the day!

Here's my crafty supplies:
Yarn, Aleene's Tacky Glue, Polka Dot Papers, and a PattieWack Pompom Tool.

First Step:
Make a pompom

Second Step:
Cut out 3 tail feathers and 1 circle.

Third Step:
Fan-fold the tail feathers and glue the papers into place to make your cute pompom turkey.
Happy Thanksgiving!
Pattiewack
Craft on! Click here for today's daily giveaway!
Friday, November 19
Party favors: Thankful Bubbles!
Thanksgiving is all about giving THANKS! And what better way than to do that than to start right as people enter your home for the annual gathering?


These are champagne bubble bottles that I've converted into "Thankful bubbles." The idea is to make a new label of something to be thankful for and then blow a bubble in its honor! It will remind your guests of the blessings in their lives, and also celebrate the acknowledgement!

Supplies:
1 package of Champagne-themed bubbles (I found these at Walmart)
1 sheet of scrapbook paper
1 bottle of Aleene's® Paper Glaze
1 jar of Crafty Chica® Chunky Glitters™
Scissors

Cut the tip of your Paper Glaze bottle at the very top to get a thin tip. This will make your writing super fine.

Cut strips of paper to fit around the bottle. Write the word with the Paper Glaze and then pour on the glitter. Tap away excess.


You can write words that represent what you are thankful for, you can write them in other languages, or you can write the names of everyone attending your feast! Let the glue dry. Wrap the labels around the bottles and secure with a small piece of tape in the back.

Craft on! Click here for today's daily giveaway!
Subscribe to:
Comments (Atom)