
What happens when I go and spend a week with my mother Fredda Perkins? We turn my daughter into a black cat bobble head! Mom and I have quite the creative synergy together and always manage to whip up something fun. I just had no idea that this visit would produce something this craft-tastical, it might be the best thing we have ever made together and we have been a craft team for over 30 years. Today for
I Love to Create I am going to show you how to create your very own personalized, black cat bobble head!
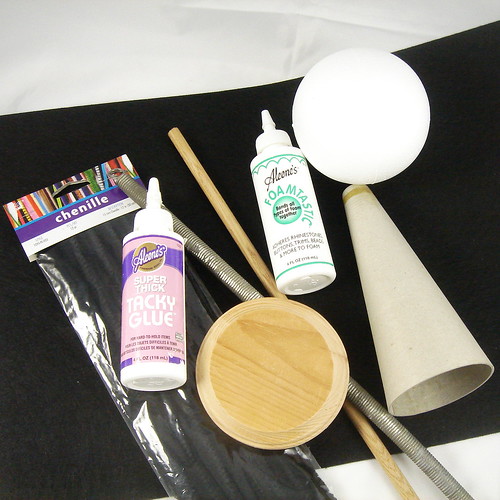 SUPPLIES
Dremel
Thin Craft Wire
Wire Clippers
Crafty Chica Little Paint Pack
Aleene’s Foamtastic
Tulip Fashion Glitter Black
3 orange balls from Pom Pom Fringe
Scissors
Straight Razor
Cone
2 Wooden Discs
Spring
Wooden Ball
Printer
Computer
Photo Paper for Computer Printer
Sandpaper
Craft Fur Black
Stiffened Craft Felt
Decorative wired ribbon
Pipe Cleaners
Small Wooden Dowel
Foam Ball
Paint Brushes
Aleene’s Original Tacky Glue
Bread Knife
Drill with bit the size of Dowel
Liquid Fusion
Straight Pins
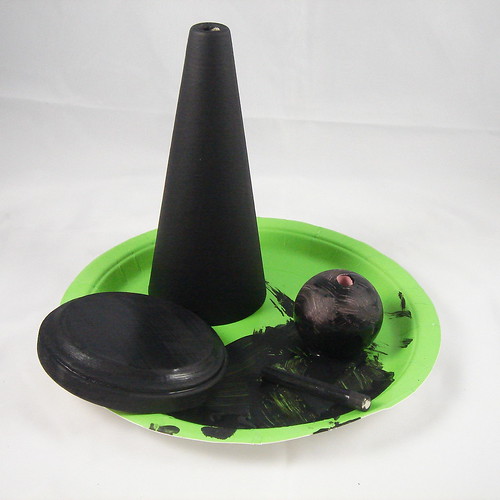 BLACK-CAT-A-FY
If you recall last week’s post on how to make a
Hissing Black Cat Banner you will remember that I collect black cat figurines that I only display at Halloween. Therefore, we opted to make the bobble head a black cat. First things first. We painted our parts black. Using Crafty Chica paint in black I coated my cone, Foam ball, dowel, wooden disc and wooden ball. If your pieces are slick or already have paint on them use a piece of sandpaper to give them a little tooth.
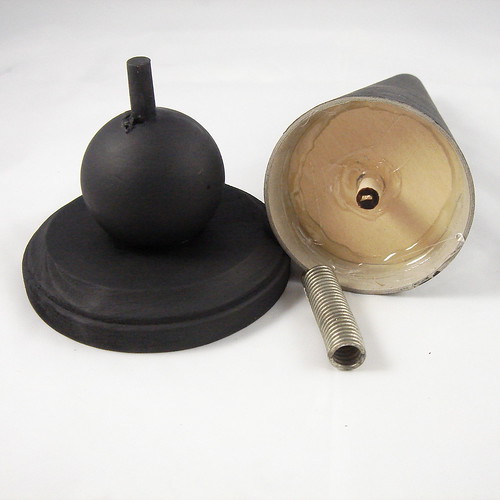 MEASURE TWICE CUT ONCE
The size of your dowel will depend on the inside diameter of the spring you use. My mom stole our spring from an infrequently used screen door in her house (shhh don’t tell my dad). You need a dowel that will fit inside the spring. You need two pieces of dowel. One should be about 1 to 1 1/2 inches long. The other should be long enough to go though your wooden ball and extend into the wooden disk below then extend above the ball about 1 inch. Attach the cutting tool to your Dremel to cut the dowel to length or use a small saw. You'll also need a cutting disk on your Dremel to cut a 2 inch lengh of spring. Using a drill bit the size of your dowel, drill holes in both wooden disks and the wooden ball.
Once the paint has dried on your foam ball use a bread knife or some other cutting tool with serrated edges to cut off about 1/4th of the ball. Lay the cut side on a sheet of sandpaper and sand it til it is smooth and level.
GLUE TIME
Next glue your wooden ball onto your wooden base and glue your longer dowel piece inside making sure about an inch extends above the ball (it will hold the bottom of the spring) and into the hole in the wooden disk. One of your wooden discs should be small enough to fit inside your cone. Glue that disc into place and also glue your dowel into the center hole. Allow glue to dry.
 EVERYTHING IS BETTER WITH GLITTER
We coated the cone with Aleene’s Tacky Glue since it is nice and thick and has good grab. From here we coated the glue with glitter to give our black cat a flocked or furry effect.
 CHOOSE YOUR PRETTY KITTY
It was hard choosing just the right photo of Tallulah, but in the end we opted for one where we could very easily crop out her face and she had a pretty smile. We cut out wax paper(you can see through it) the size of the flat surface we had cut into our boam ball to use as a template. We printed the picture on photo quality paper. We placed the wax paper over the photo and once satisfied with the placement, we cut out the circle picture. Using Aleene’s Foamtastic Glue we adhered the photo to the foam ball and allowed to dry.
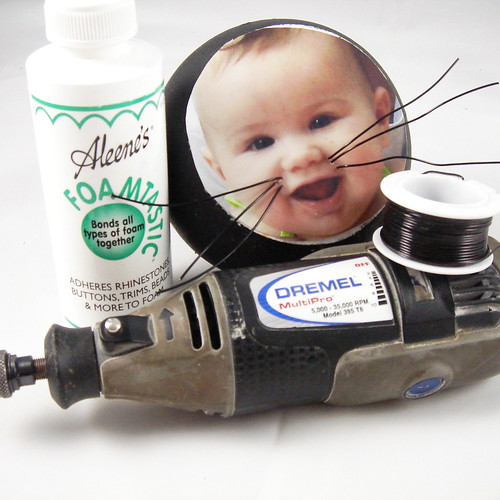 WHISKERS
Using the teensiest weeniest bit you can find for your Dremel drill 3 tiny holes on each cheek of your photo. Using wire clippers clip off 6 4” pieces of wire. Stick the wire through the holes and into your foam to secure. Do not use glue, as it will pool up on your photo. Bend and trim wires to desired length and style.
 THE BETTER TO HEAR YOU WITH
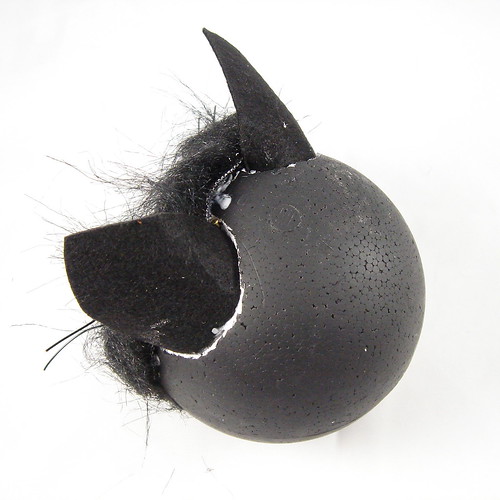
Cut out two ears from stiffened craft felt. Mark where you want the ears on your foam bobble head. Using a straight razor carve a little slit where the ears will go. Fill the slit with Aleene’s foamtastic Glue and stick your ears in. Allow to dry. You may need to use thin nails or pins to hold the ears in place until dry.
 FUN WITH FUR
We had a dickens of a time finding craft fur, save yourself the trouble and go to Hobby Lobby first. Cut your Craft Fur into strips and adhere to your bobble head with Aleene’s Foamtastic taking care around the face and ears. Once the glue has dried you can go back and give the kitty a haircut especially around the face.
ARMS AND TAIL
Using a drill we put a hole in either side of our cone and wired a pipe cleaner through. We cut out paws from the stiffened craft felt and attached with Liquid Fusion Glue. We also drilled a hole for the tail and used a chenille pipe cleaner since it was a bit puffier.
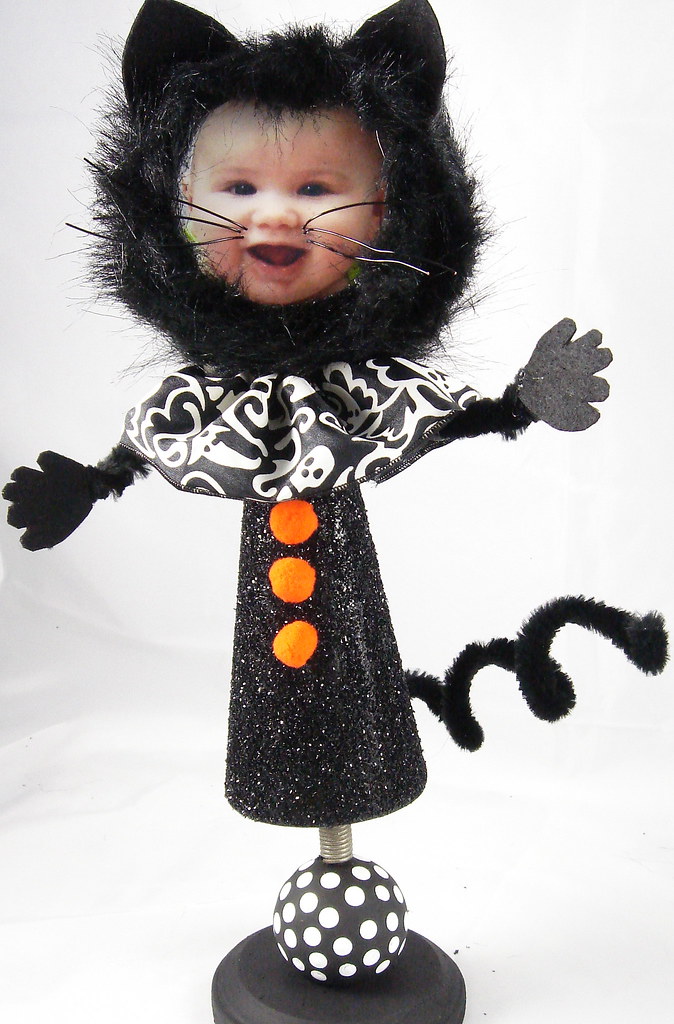 PUT IT TOGETHER
Once all your glue and paint are dry, put all your pieces together. You are going to need to carve out a small hole in the base of your foam ball in order to attach it to your cone. Again we used Aleene’s Foamtastic Glue to attach the ball to the cone.
We also made a ruffle collar using wired Halloween ribbon to hide where the two pieces connected. To ruffle the ribbon, just pull the wire on one edge making sure it doesn't pull through on the other end. We also added 3 pom poms from ball fringe as buttons. As an added bonus, once the black paint was dry I added polka dots to the wooden ball using a small dowel (the end of a nice new pencil works well too).
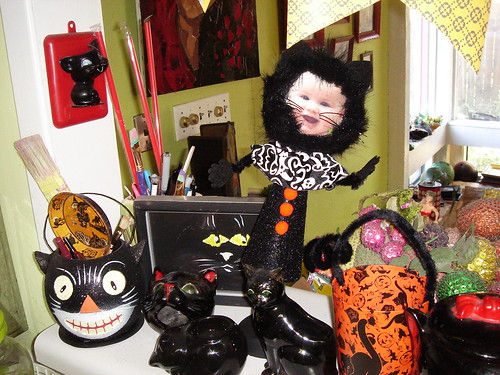
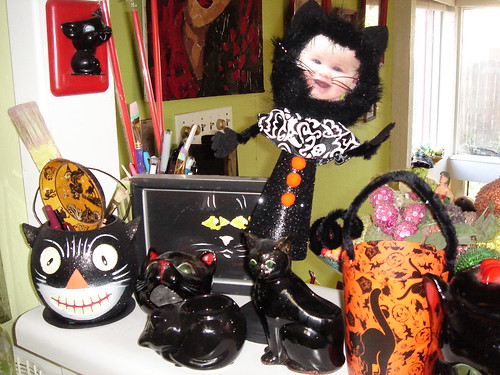
All that was left to do was display my new purrrrfect bobble head with the rest of my black cats. Tallulah fits right in and the bobble head is so cute I may leave this one black cat out all year round.


 There's something magical about being able to dye your own yarn to any shade you wish, especially when that yarn is intended for a simple project that's perfect for showing that color off. Today on


