Showing posts with label Tulip glitter transfer sheets. Show all posts

Monday, February 9

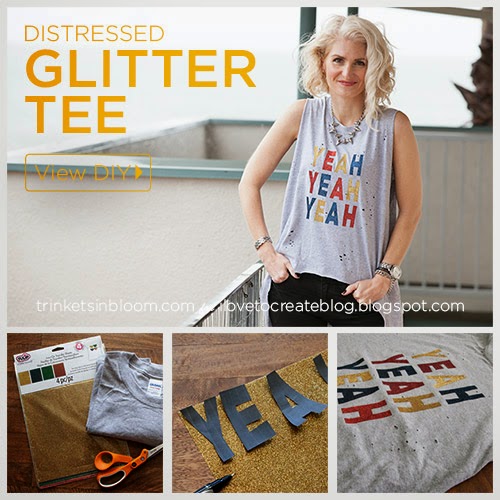
Distressed Glitter Tee DIY


It’s easy to create fabulous colorful graphics on t-shirts with Tulip’s Iron-On Transfer Sheets. Personalize your tee and create some distress with a high low hem for a super chic tee you can pair with jeans, leggings or even a skirt. I love the unexpected length in the back mixed with a cool graphic and an old school feel on the front. These transfer sheets work so well and so quickly you’ll want to make a ton! Let’s get started!

Wednesday, December 10

DIY Geometric Pillow


Want a fun way to add a little Sparkle to your room? This DIY Geometric Pillow is the perfect way to add that little pizzaz to your space without it being over kill. The modern geometric design is super trendy and the glitter is super girly!

Tuesday, December 9

Easy Holiday Infinity Scarf.


 I love to put something warm around my neck when it is cold outside.  Making  a inexpensive scarf out of a tee shirt is the best way to be creative and have a different scarf  everyday. Tulip Glitter Transfer Sheets come in all different colors and are quick and easy to use, and if  there is  one thing I do not have right now is loads of time. This project took me about 30 minutes  to complete.
These would even make great gifts.


Tuesday, December 17

Santa Sacks

 I thought it would be fun this year to have a special way to wrap the presents that are from Santa, so I made these "Santa sacks" to put under the tree for my boys.  You can make these even if you don't sew.  How?  It's a pillowcase.  Easy peasy.

Monday, November 25

Holiday Gold Bow T-Shirt DIY

Add some sparkle to the holidays by creating a fun Holiday Gold Bow T-Shirt DIY using the easy to use Tulip Iron-On Transfer Sheets. With all your holiday running around and shopping to do, it’s easy to just throw on a t-shirt and go. But why not add some sparkle and a festive bow to keep those errands from becoming too dull and help spread some festive cheer! This is a simple and quick way to create your own t-shirt designs to wear for the holidays and they’d make great gifts too!
TOOLS & MATERIALS:
T-Shirt
Iron
Scissors
Design
Pen
Cloth for ironing
step 1
Draw out your design on a piece of paper or use a stencil if you have one.
step 2
Trace around your design on your Tulip Iron-On Transfer Sheet. 

You’ll need to use a pen for this to make sure you can see your lines.

step 3
Cut out your design carefully to make sure you don’t see your pen lines.
step 4
Place your design on your t-shirt where you want it.

Lay your cloth over your design and press with your iron.

Keep moving your iron around for about a minute to make sure your design is set.

Make sure you use a dry setting on your iron, NO STEAM.
Check your design to make sure it is all secure and adhered to your t-shirt. If you need to you can iron it more to make sure it’s secure.
These Tulip Iron-On Transfer Sheets are so easy to use. I was really surprised at how well (and quickly) they attached to the t-shirt. It was really simple. You can use these to make so many fun graphic T-Shirts to wear yourself or give as gifts. 
For more fun fashion DIY’s check out my blog Trinkets in Bloom! You can also follow me on Facebook, Twitter and Instagram.
xoxo
Cathy

Tuesday, October 1

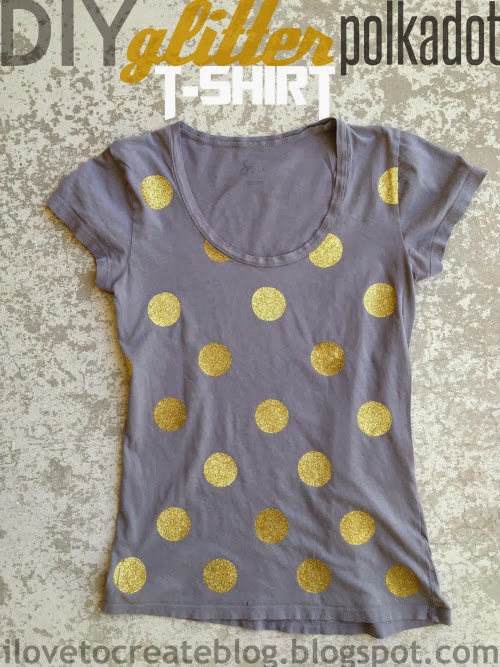
DIY Glitter Polkadot T-shirt

One of my very favorite Tulip products is the fashion glitter transfer sheets.  I think it's so cool that you can easily put glitter anywhere without making a big mess.  The transfer sheets made this glitter polkadot shirt really easy to make.

Tuesday, November 13

Glitter Peter Pan Collared Tee

The other while browsing some children's clothing I came upon this shirt from JCrew and I thought it was so cute.  


I knew it would be easy to recreate using glitter instead of sequins, so I went to work and made this.


Here's how I did it.  I purchased a plain $4 tee.  It had a pocket, which I carefully removed.  You can see the outline of it here, but when you wash it it will disappear.


I laid some paper over the shirt and sketched a collar.  I cut it and adjusted it until it fit correctly.  I also took the paper and folded it in half to make sure my drawing was symmetrical.


Then I traced my collar onto my Tulip Glitter Transfer Sheets.


I double-checked the fit....


...and then peeled off the top layer.


I set a sheet over the collar and then ironed it on place.


And that was it.  I like $4 a lot more than $42.


Dress it up or down.  I think it would be cute to sew on a couple of little buttons along the middle strip.


Tuesday, March 6

Double Dipped Glitter Skirt

My sister will be having her first little girl this week, which gives me the opportunity to use a bit of glitter in my crafting.  I made her this tiny glitter outfit, with a little salute to her superhero-loving brothers.


I started with a plain shirt and skirt (which I got from Wal-mart).  I used my Tulip Glitter transfer sheets.  The beauty of these sheets is that you can do glitter without the mess.


I started by cutting one inch strips out of the glitter sheets.  (In hindsight, I probably should have cut the pieces a little curved rather than straight.  The ruffles on the skirt were slightly rounded.)


I peeled off the clear protective top and then ironed the strips onto the skirt.  I found it was easiest to cut the strips into smaller pieces to apply them.  The glitter sheets can overlap each other a bit and you'll never notice it.  


To apply them you place a cloth over the top and press the iron onto it for 30-45 seconds.  


I made my way around both layers of the skirt until it was finished.


For the top I made an emblem like Superman, but changed it to an "M," since her name will be Millie.  Super Millie!  I used the glitter that matched the shirt, so it wasn't too loud.


Now she'll have a glamorous girly look, with a brother-approved superhero signature.


Thanks for dropping in.


Tuesday, October 18

Peacock Tee

A few weeks ago I had a niece stay over night.  She has a major obsession with peacocks, so we decided to make her a peacock t-shirt.  Here's how it turned out.


We were inspired by THIS peacock print.  We got out our Tulip glitter transfer sheets and our Scribbles 3D paint.


We cut a ton of raindrop shapes out and peeled off the backing.


Once we had them arranged how we liked them we laid some fabric over the top of them and ironed them on (along with a little wing for the peacock.)


We drew in the peacock body with 3D paint.


And that was it.


She's holding the shirt up because it was still wet so she couldn't wear it just yet.  She loved it (probably more so because she even got to help make it).


Thanks for dropping in.


Clicky Web Analytics
Pin It button on image hover

Subscribe to our newsletter

* indicates required
I am interested in products and inspiration for...
Close