Showing posts with label applying crystals. Show all posts

Wednesday, April 15

How to Bling-Up a Lamp


Happy Hump Day! Jaderbomb here and I am super stoked to show you what I made with my new tool from I Love to Create! Now I am from the South (DEEP SOUTH) and if you know anything about us cajuns then you know we LOVE everything jazzed up.  No kidding, we bedazzle anything and everything. The only problem is you have to BUY everything jazzed up already and you are sorta limited to what you can get. NOT ANYMORE Y'ALL!!!!

Today I am going to show you a snazzy little tool that will allow you to put jewels EVERYWHERE! 
I have so many ideas to use this for. Since Summer is right around the corner you can buy a plain bathing suit and add these jewels to the top part, decorate a onesie, an I-pad case, a pillow case and so much more. 

This is also a really great craft for kids to do. Just make sure they are monitored because this tool gets REALLY HOT and we don't want them to burn themselves. How cute would that be!
Let's get started!!!

Friday, December 6

Sweatshirt Hack: Sparkle Sleeves

Tis the season of sweatshirts. They are warm and comfy, but lordy, they look so frumpy. I love that I've seen other chicas take a pair of scissors to them to alter them in a more fashionable way. I wanted to get in on the fun, but I needed to find a way to make my design appear appealing for my plus-size bod. Here's what I came up with!

Wednesday, February 6

MAYA IN THE MOMENT: DIY Crystal Phone Charger!

I've been in a sparkly mood lately and have been gluing Tulip Glam It Up Crystals on just about everything! Not only my iPhone case and headphones, but now even my charger. Think I'm crazy? Check out "crystal phone charger" on Etsy, Pinterest and eBay and you'll see from the listings that I'm not the only one. People are charging big bucks for these and now I'm going to show you how to do it on the cheap!

Side note - yes, I blinged my headphones too. Don't judge!
Aside from your charger, you'll need Aleene's Tacky Glue but you can also use Liquid Fusion. You'll also need Tulip Glam It Up Crystals in your choice of color, a toothpick and a paper plate to squeeze the glue onto.

Use your toothpick to add a layer of glue to one side of the charger. Next, spread out your crystals. Use a crayon or Tulip® Glam-It-Up!™ Fashion Art Tweezers™ to pick up and apply each one. NOTE: The mini size of crystals works best!
Apply your crystals one-by-one.
You can decide what pattern you like - flowers, ribbons, circles or just all random and mixed up like the one I made.
 
Halfway finished!

 
I also did the other end of the charger too.
Done! I love it, it makes me feel so Hollywood. Like, if I happened to be walking the red carpet and needed to charge my phone, I could whip this out and still feel glamorous!

Thanks for checking out my project! come join me on my Facebook page! http://facebook.com/mayainthemoment


Friday, January 18

CRAFTY CHICA: DIY Crystal Eyeglasses!

A couple of years ago, I noticed my vision was starting to...well, SUCK. I couldn't zero in with precision like I used to. That's what a life of beading, sewing, painting and gluing will do to a chica. Instead of pouting, I decided to embrace the fact that I needed reader glasses and am now a collector of cool specs.

But when it comes slaving away in the art studio, I don't want to use my spendy finds. I go for the cheapies, but then those can be boring. Life is so hard!!!! (lol)

Call it procraftination on another project, but one day I sat down and embellished all my low-budget reader glasses...and made a video tutorial! Now I have sparkly energy at all times!

These are great to give as gifts, or for your favorite bookworm or girls night for crafting. Next, I want to make fabric sleeves for them too!

Supplies:Tulip® Glam-It-Up!™ Iron-On Crystals™ 
Tulip® Glam-It-Up!™ Fashion Art Tweezers™
Liquid Fusion® Clear Urethane Glue 
A chopstick or toothpick
Paper plate

Directions: Squeeze out some glue and apply to the top of the frames and then add the crystals, one-by-one. Check out my video to make the process super easy - plus a couple other insider tips!


LINK

Friday, December 21

CRAFTY CHICA: How To Apply A Crystal Monogram Using Tape

LINK

Last week I was at the iLoveToCreate headquarters in Fresno, CA hung out in the design studio all week. It's a crafter's paradise, let me tell you! Product everywhere, finished pieces all around, designers working on new projects, brainstorming meetings, product development think tanks - it is creative stimulation overload and I love every second of it!

Whenever I'm in town, my desk is next to that of Lauri Eaton's. She is a recent grad from FIDM, and is teeming with techniques and ideas. She was working on some ornaments and needed a quick way to make monograms using our Tulip Glam It up Crystals...her brilliant idea? Well, just watch the video to see for yourself!

Saturday, July 16

Star Gazing Tote Project!

Get inspired by the celestial trend and make a super easy, stylish tote that you can load up with your favorite summer must-haves and head out the door.

Here's what you need:

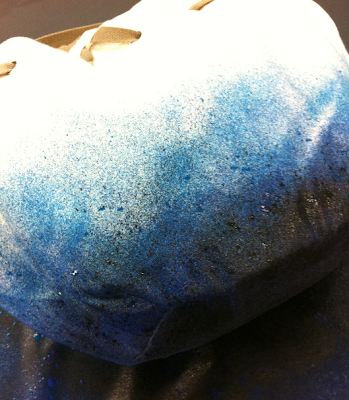
A tote. I picked up this canvas tote bag fully lined at Walmart for a mere $10.Tulip Fabric Sprays in several colors. I chose Sapphire, Dark Teal, Black, and Grape.
Tulip Glam-It-Up Crystals and cordless heat setting tool

Here's how you make it:

To create the look of a night sky, spray your tote with the Sapphire color first. Spray completely around the bottom of the tote.Next, spray the Dark Teal above the Sapphire color, letting the overspray blend the two colors.Spray Asphalt (black) on the bottom area of the bag. Be careful not to cover too much of the Sapphire and Dark Teal.Finally, spray on light touches of Grape here and there. Let dry.

To create twinkling lights in your sky, use the heat tool to randomly apply the crystals. It takes about 10 seconds per crystal. Use as many as you like.


Pack your tote and get going!Visit us on Facebook!
Craft on!Click here for today's daily giveaway!

Sunday, September 27

Sassy Tote Bag for the Sewing Expo Tour!


I'm flying to D.C. on Wednesday to the Sewing Expo for Hancock Fabrics to demonstrate The Tulip® Dye Techniques Kit™ and the Tulip® Cordless Heat Setting Tool™ with the Tulip® Glam-It-Up!™ Iron-On Crystals™ combined to create a cute and sassy quilted tote bag and a mini quilt wall hanging.
The Sewing Expo is part of a national campaign to bring inspiration, motivation, education and personal satisfaction to everyone who enjoys sewing, quilt making, embroidery, embellishment and related needle arts. I can't believe I get to be a part of this amazing event.

So, to design the sassiest little bag with dyed fabric, I first have to grab my supplies at the iLoveToCreate design studio and dye my little heart out. I decided to create 3 of the 5 techniques in the kit for my projects.

Our house in Clovis has a darling patio out back with a ceiling fan, and it's just begging to have a little dye party, so I got the fan buzzing, and laid out my kit. I grabbed 2 kits, because I needed 12 yards of fabric for the tote, the quilt, and the demo swatches.

First step? I washed and dried all the 100% cotton fabric to take out the sizing and prepare it for the dye.

My steel sink is perfect for mixing the dyes. They're great because all I have to do is put on my gloves and then fill all the bottles with water (the dye is already in there) and shake.

Scott set up a table cover with plastic trash bags. Of course he used bungies to hold it down. I call him Bungy Man. (When I'm not calling him Zip-tie Man.)

I started with the shibori technique and since my project is so humongus, I taped the 2 tubes together that come in the kits.

Then I laid it under the fabric and scrunched it up. The shibori tube holds the fabric up so that you get that cool look, and keeps it from puddling. You'll see!

Now, the dying begins. I squirted it onto the fabric along the top of the tube. Then, I moved the tube over about 8 inches and repeated until I was at the end of the fabric.

Voila! I hung it on the clothesline and replaced the trash bag with a new one for the next color.

Woohoo, the brush technique was amazing. I simply poured my dye out of the bottle and into a disposable bowl, dipped my brush from the kit into the dye, and made crisscross strokes all the way across. Loved it.

After changing the trash bag on the table again, I was ready for the spray technique. This was soooo easy and fast. I made little hills and valleys with the fabric, then used the spray top from the kit to spray away.

I don't know what the neighbors think, but it sure gave them a colorful view while the dye set for 4 hours. Last step, wash and dry the fabric separately and then make my little tote bag.

I love how the cotton dyed fabric turned out and it feels good, not crunchy. I'll be posting the project at iLoveToCreate.com with all the instructions right away.

The crystals were uber easy to apply with the heating tool, and I think they added a little sparkle-farkle to the bag. Like I said, super fun, and a little bit sassy with the crystals and in bright, happy colors.

Come see me at the Sewing Expo in Chantilly, VA! I'll be there Thursday, Friday and Saturday in the Hancock Fabrics booth. Look for the gal with the bright green tablecloth and the happy smile.... I'll show you how to dye fabrics for your quilting and sewing projects, and our cute little cordless heating tool for jazzin' up your projects.

See you there!
Pattiewack

Wednesday, September 2

Knitted Revamped Earrings with Crystals!


With just a few knit stitches and some added sparkle, an otherwise undesirable pair of earrings are easily made Mod. Dig into that jewelry box for a tired, ol' pair of tarnished hoops and some scrap yarn, and turn them into revamped ear baubles. No waste + New Wearables= Good Stuff. Here's how!


Materials
Old Pair of Hoop Earrings
Scraps of Sock Yarn or Sport-Weight
Two, Size US 2(2.75mm) or 3(3.25mm) Double-Pointed Knitting Needles
Tapestry Needle
Fabric Fusion (optional)


Knitting Directions (Make 2)
Cast-on 3 stitches onto left-hand needle. Lay needle with stitches on top of earring, at one end of hoop.


Take the working yarn (the one connected to the ball) and bring it UNDER the hoop; knit stitches. The yarn will now be connected to the earring and the stitches will be on the right-hand needle.

Slide stitches to opposite end of needle and switch hands so the needle with the stitches and earring are in your left hand again. Bring working yarn back around behind the stitches and under the earring and knit the stitches again (this technique is known as knitting i-cord). Continue in this manner until earring is covered.

Bind off. Weave in ends. If necessary, add a dab of Liquid Fusion to the back, to keep woven-in ends in place.

Bejeweling How-to
Place a glass crystal onto desired place on the earring. Place pressure on crystal with the hot, heat setting tool for 15-20 seconds (or until secure). Repeat around; evenly spacing crystals.


Craft.Rock.Love,

Vickie Howell is a mother, designer, author and crafty spokesperson.  Her latest book, AwareKnits: Knit & Crochet Projects for the Eco-Conscious Stitcher, hits stores in October. For more info go to:www.vickiehowell.com

Friday, June 19

Our heat tool was on The Fashion Show on Bravo!

The other day, we were flipping through channels when we came upon our very own Tulip® Cordless Heat Setting Tool™ on Bravo's The Fashion Show! They had a great challenge where the contestants were each given a backpack with contents that described a particular high school clique. They ranged from jock, to mean girl to tree hugger. They were then asked to create a graphic tee for a student presidential election based on that clique.

One contestant had "Preppies" and decided to accent his shirt using crystals (we're not %100 sure they were ours, but the Tulip® Glam-It-Up!™ Iron-On Crystals™ were created to go hand in hand with our heat setting tool)! Check out the heat tool and our crystals in the fashion aisle the next time you are there! It's a super cool that lets you apply mini crystals quickly and easily, just like James-Paul did on his pink and black design!

Clicky Web Analytics
Pin It button on image hover

Subscribe to our newsletter

* indicates required
I am interested in products and inspiration for...
Close