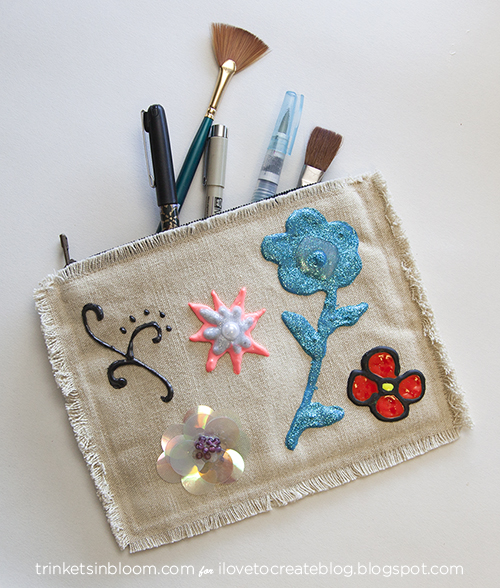
This fall it’s all about embellishment and it’s super easy to create your own personalized Embellished Appliqués to add to a bag, a jacket or really anywhere you want using Tulip’s Dimensional Paint. This paint is so awesome, it comes in so many colors and it looks great after it’s dry. You can even add extra embellishments to it like; beads, sequins or glitter to up the wow factor! Let’s get started!
Showing posts with label puffy paint. Show all posts
Showing posts with label puffy paint. Show all posts
Monday, September 28
Thursday, May 28
Faux Beading with Puffy Paint


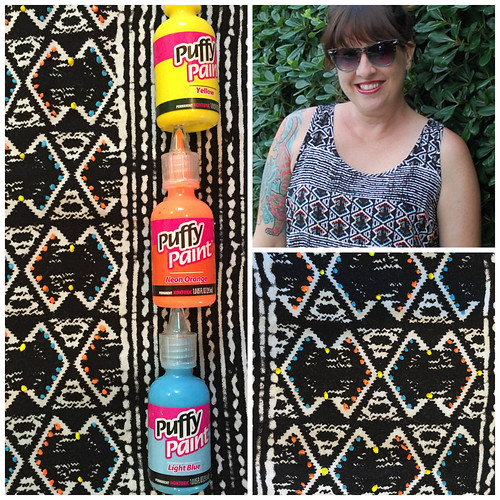
I am always a fan of crafty shortcuts. If there is a fast dry glue I'm in, a dye with fewer steps sign me up and any no-sew project is a friend of mine. One of my favorite crafty shortcuts is faking the look of embroidered stitches with Puffy Paint. My felt appliquéd Christmas tree skirt and Slice of Citrus Tote are perfect examples. I love the look of beading and thought, why couldn't I get the same look with Puffy Paint in place of beads.
Labels:
beaded,
faux beading,
jennifer perkins,
puffy paint
Monday, March 23
DIY Text Sweatshirt
There’s nothing like a comfy sweatshirt when the weather’s chilly, so why not embellish it with a fun saying to step it up a notch. The Tulip Dimensional Paints are super easy to use and create perfect dimensional letters.
Wednesday, February 11
Puffy Paint Monogram Storage

I have totally fallen for the Monogram trend. I just want to put my initials on everything! I made this supper cool Monogram storage tote for my friend using some Puffy Paint and her initial that I printed from my computer using word art. It was so easy!
a denim or fabric storage bin
Word Art letter (printed and cut out)

Step 1: Using the Clear Gell Tacky Glue, wrap ribbon around the bin near the top. Layer 2 different ribbons for more visual appeal.

Step 2: Place the cut out word art letter in the middle of the storage bin. If you are worried about it moving you can adhere it down with repositionable adhesive. Take the puffy paint along the outside of the letter. Add more dots closer to the letter and less as you move outwards. Then remove the paper letter.

Step 3: Cut the ribbons into about 6 inch strips and tie and tie them around the handles. You can add a few or cover the entire thing like I did. This adds such a fun twist!

It was so easy to make, but the results are awesome! Personalization is everything these days! This would be such a cute basket for a gift too, that they can then use as storage in their room! It is perfect to store all of those random knick knacks in a stylish way!
Wednesday, January 28
Tuesday, January 27
Tropical Fish Bathroom Jar
When you think of a child’s bathroom, more often than not it’s a fish/ocean theme with bright colors and adorable sea creatures. The ocean is full vibrant life from the sea floor to the shallow waters. I’ve incorporated some of these colors with the adorable theme found in so many children’s bathrooms!
Labels:
amanda formaro,
bathroom,
crafts by amanda,
jar,
kid's crafts,
puffy paint
Thursday, November 20
6 Ways To Transform Your Ornaments With Puffy Paint
Looking for some super cute ways to decorate your ornaments this season that won't break the bank? Whip up some adorable ornaments in minutes using a craft closet staple - Puffy Paint!
Now, when we talk about Puffy Paint, we actually are talking 3D Fabric Paint! We make several brands of this paint, but recommend the Scribbles or Puffy Paint brand, which can be found at your local craft store!
Wednesday, November 12
Inspiration Board
Monday, September 8
DIY Spider Necklace Using Tulip Dimensional Fabric Paint
Tuesday, March 4
Puffy Paint Faux Embroidery Pillowcases
Right now both neon and geometric shapes are totally in! And embroiderers have taken notice! If you want to jump on this train but don't want to spend the time embroidery takes, why not knock out some Puffy Paint faux embroidery?
Monday, January 27
Congrats to Grammy Winner, La Santa Cecilia! We love your shoes!
Yesterday, the Los Angeles band, La Santa Cecilia took home the award for Best Latin Rock, Urban or Alternative Album! Why are we so excited for them?
Well, because lead singer (and now Grammy winner), Marisoul is an avid crafter. One of her specialties is making her colorful wardrobe ensembles for her performances - which includes numerous pairs of dance shoes that she embellishes with PUFFY PAINT!
Read on to see her magical shoes that she paints, and music videos too!
Monday, November 4
Thursday, October 31
Friday, October 18
Puffy Paint Hoop Earrings
Tuesday, June 18
How to make a Tie-Dyed Fringe Necklace
TIE DYED FRINGE NECKLACE
Jaderbomb for iLoveToCreate
It's that time of year to sport your brightest jewelry and I have something fun to show you. Of course it's great to buy things at the store but you will never find anything that fits you perfectly. You know what I mean, your favorite colors, style, shape and so on. That's why today I will show you how you make your very own tie dyed fringe necklace. I love this craft for the simple fact that you can make it how you want with your favorite colors. Let's get started.
You will need:
*Tulip 5 Color Tie-Dye Kit : (Red, Orange, Lime, Teal, Violet)
*Tie Dyed T-shirt
*Scribbles 3-D Paint
*Fabric Scissors
*Chain Necklace
*Fabric Scissors
*Chain Necklace
*Lot's of LOVE
Here are some of the different ways you could tie dye. For this necklace you could use any design because in the end you will have strips of fabric and the design won't be that obvious.
This is what comes in your standard 5 piece set. I tie dyed a ton of white shirts with different colors so I would have different options for my necklace.
*Rubber Bands*Powdered Dye
*Clear Gloves
*Instructions
*Squirt Bottles
Just have fun with your design.
I love scribbles fabric paint. This paint surely brings me back to my childhood!
I recommend doing your shirt the day before you do the necklace. If you have never tie dyed you could check out this tutorial. It's so easy and you will have so much fun.
First thing you will do is lay your shirt out flat on a surface you can cut on. I put my shirt inside out just so you could see the seams.
1. Cut the bottom part of the shirt off.
2. Cut the top portion of the shirt off. I cut right below the arms, horizontally.
3. You will have a tube portion of your shirt now and two seams, on the left and right.
4. Pick a side you want to start on and cut the shirt into strips.
2. Cut the top portion of the shirt off. I cut right below the arms, horizontally.
3. You will have a tube portion of your shirt now and two seams, on the left and right.
4. Pick a side you want to start on and cut the shirt into strips.
Remember earlier when I said I dyed ton's of shirts. Here is another one that I made. I wasn't sure what kind of mood I would be in when I made the actual necklace so I wantet options! I actually decided to go with the "OMBRE" rainbow shirt. To do this, all I did was lay a shirt out flat and gradually add different colors from the bottom of shirt to the top. When I do this I like to add red next to yellow so I can get shades of orange. You can also put yellow next to green to get shades of lime green. It's so fun!
Once you cut your strips you will have the seams left. Take your fabric scissors and cut the seams off. There is no right way to do this because in the end all we want is tiny strips of fabric. Pull the strips with so your fabric will curl.
On to our next step. Get your chain necklace out. We are using a chain link necklace because we need the holes to pass out fabric through.
Cut your strips into the length you want and put the two tips together.
1. Pass the loop through one of the chain links.
2. Pull it through. The loop will be at the top now.
3. Take the two pieces at the bottom of link and pass it through the loop.
4. Now pull the two strait pieces downward to create a secure knot.
2. Pull it through. The loop will be at the top now.
3. Take the two pieces at the bottom of link and pass it through the loop.
4. Now pull the two strait pieces downward to create a secure knot.
This is what it will start to look like.
OK! I am seriously in love with these colors. I can't wait to wear it with a white tank top. The colors will POP like crazy!
Pick your color of fabric paint.
I am using white so my dot's look like pearls.
I only put them on the tips.
If you have left over fabric strips you could make fringe earrings! Using the same steps. I didn't put pearl dot's on these.
They are so cute! I would not recommend wearing the necklace and earrings at the same time. It might be a little too much!
You could give this as a gift to someone or make 10 just for you. Remember you can make this as short or long as you like.
PEACE!
I had so much fun making this necklace and I know you will too! I love how you can make it whimsical or classy in 5 minutes.
Huge hugs from my craft room to yours! See you soon.
P.S. I promise when you start playing with Tie-Dye you won't be able to stop, he he!
*Find more of my DIY decor at JADERBOMB.COM*
P.S.S. What colors would you use for your necklace!
Oh and check out my other posts for iLoveToCreate below!
Subscribe to:
Posts (Atom)


