Showing posts with label back to school. Show all posts

Saturday, August 15

Googly Eye Chalkboard - Dollar Store Craft

DIY Googly Eye Chalkboard - Dollar Store Craft
Back to School requires eye-catching accessories for your locker or dorm room door, like this Googly Eye Chalkboard, made with Aleene's The Ultimate glue and some dollar store supplies.

Find out how quick and easy this back-to-school craft is!


Monday, July 20

Doodled Journal Covers


I seem to have a thing for notebooks, sketchbooks, journals, basically anything paper. What I love best about them (aside from everything) is being able to personalize them, to make them your own. Many journal or sketchbook covers are fabric which makes them perfect for decorating with drawings or doodles using fabric markers. For lighter colors you can easily use the regular fabric markers but for dark colors Tulip’s Opaque Fabric Markers work perfectly! With back to school right around the corner, decorating a new sketchbook or journal is a perfect way to get ready for the new school year. Let’s get started!

Friday, August 22

Play Scrabble On The Fridge


Do you love to play Scrabble but find it hard to play board games these days with everyone going in different directions? With school back in session, kids going to practice and recitals, and parents pulled between work, dinner and who's going to what game, it can be hard to make the time.

Instead, here's a fun way to have an ongoing game of scrabble that everyone in the family can play no matter when they are home!


Friday, August 15

Puffy Tissue Paper Pencil


Depending on where you live, your kids are either back in school by now or they will be within the next couple of weeks. In the spirit of "back to school" I've created this fun art project for the kids shaped like a pencil. It's a great after school project, or a fun art assignment if you're a teacher!


Thursday, August 14

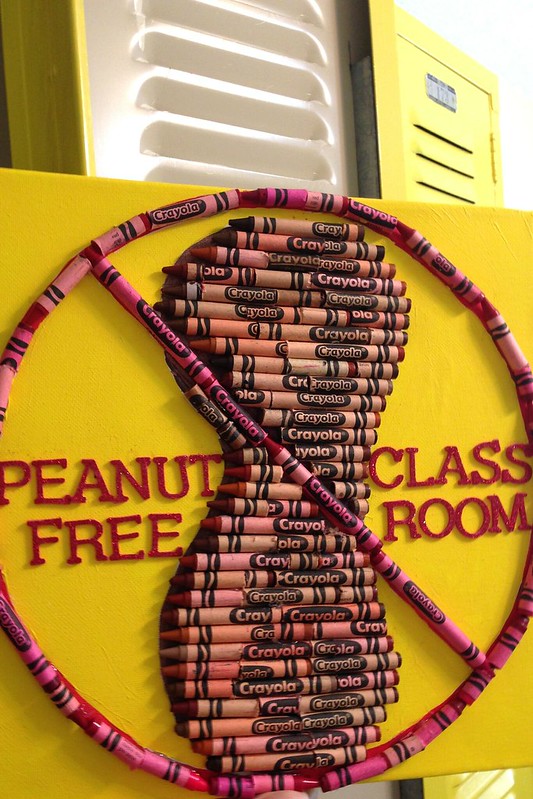
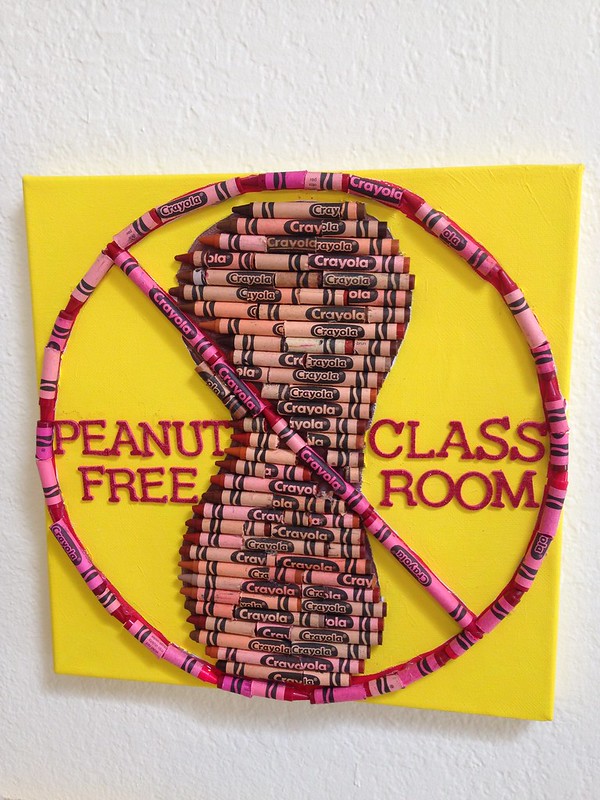
Peanut Free Classroom Sign

Back to school is a time of excitement, joy and for me fear. My son Baxter has a peanut allergy. It is my job to be his advocate and help educate the people around him about the severity of food allergies. He will be attending pre-school for the first time this fall and obviously I'm a little on edge. The school is peanut free, but most are not. Many schools have adopted the policy of having peanut free classrooms which is great. Finding a clever school related way to say "peanut free" is not always easy. One day while coloring pictures with my son I had an idea about how to get a very serious point across in a not so serious looking way.

Wednesday, February 8

iLoveToCreate Teen Crafts: Geek Chic Dazzling Calculator Cover

Visit us on Facebook!
Craft on!


iLoveToCreate Teen Crafts
Geek Chic Dazzling Calculator Cover
Copyright Avalon Potter
"Teen crafted, mom approved."


Avalon is one of those amazing kids who excels at math and science and the fine arts. She takes advanced level classes and there are times when the work gets pretty tough. What better way to face the daunting task of a quadratic equation than armed with a little sparkle power? Tulip PDA (Personal Dazzle Assistance) makes quick work of taking a calculator from blah to BLING as quick as you can say Pythagorus. Isn't this fabulous? I am a proud mom indeed. Go, Avalon!


Materials
Calculator with cover
Tulip Glam-it-Up PDA Crystal Set in red and clear crystal
Scrapbook paper or cardstock
Heart stencil (we used the Fiskars 3" heart shaped template, cutting out the center of the heart using the 2.5" stencil.)
Aleene's Tacky Dot Runner

Tools
Fiskars Hearts Template and Cutting Tool
Nimble fingers!

1. Use template and tool to create open center heart using cardstock or scrapbook paper.

2. Use tape runner to add a little stick to the back of the stencil and adhere to the center of the calculator cover. Be sure cover is clean.


3. Starting from outside work your way to the center of the heart adding crystals as in photo. Alternate between red and clear crystals until you reach the center red crystal. Remove stencil and wipe any glue residue away.

4. Use the crystals to frame the outer edge of your calculator cover. Work only on the hard areas, leave the soft areas uncovered. There are 16 clear crystals at the top and bottom with 15 red crystals directly beneath them. On the sides there are 5 clear crystals on the top sides and 22 clear crystals on the bottom sides. This is a TI-inspire calculator, so adjustments will need to be made if using a different model. This calculator cover is 3"x8".

5. To create the x patterns, form a v shape with five clear crystals at the point of your heart. Add a second 10 crystal v shape using the red crystals. Create a 15 crystal v shape using the clear crystals. Repeat this pattern to form a mirror of the top half as in picture. Add 10 red crystals in the open areas of the center crystal x as in picture. Repeat this process at the top of your cover.

6. Check back to be sure all crystals are securely applied. Now get to that math homework already!

Wednesday, August 24

Back To School Craft - Marker Monster!

Marker Monster
Back To School Craft

The kids will love it if you make this adorable roll-up for their markers!
Go to the iLoveToCreate website to get all the details.
Have FUN with it!


Visit us on Facebook!
Craft on! Click here for today's daily giveaway!

Friday, August 12

Cool2Craft TV - Monday August 15, 2011


Cool2Craft TV for August 15, 2011: Back to School

Join host Tiffany Windsor for a new episode of Cool2Craft TV. This week's show theme is all about back to school. Tiffany is decorating a t-shirt graffiti style with Tulip Fashion Graffiti Fabric Paint Cannons and Tulip Fabric Spray Paint, EcoHeidi is decorating a wooden pencil box with the vintage Aleene's Look of Copper Enamel technique using Aleene's Original Tacky Glue and Candace Jedrowicz crafts a fabric book cover with Aleene's Fabric Fusion.

It’s easy to watch Cool2Craft TV right from your computer. Airing Monday August 15, 2011 9am Pacific/10am Mountain/ 11 am Central/ Noon Eastern. Go to http://cool2craft.com and find the Livestream player and chat box. See you Monday!

Visit us on Facebook!
Craft on!Click here for today's daily giveaway!

Wednesday, August 10

ILovetoCreate Teen Crafts: Cake Flower Folder

Visit us on Facebook!
Craft on!Click here for today's daily giveaway!

Mom says, "Avalon made a cute tank top for me this summer using 'cake flower' techniques. I love the look of these and think they have absolutely ENDLESS applications for designs. The dimensional fabric paint is perfect for this, because like a bead of icing it gives you enough color to spread and create this embroidered look. Very cool, Avalon!"


IlovetoCreate Teen Crafts
Back to School Cake Flower Folder
Avalon Potter
“Teen crafted, mom approved.”

I love to decorate cakes. One of my favorite techniques to use on cakes is called brushed embroidery. I was messing around with some Tulip paint and found this technique works just as well with paint as it does with icing! So being that it's back to school where I live I thought what better way to trick out my folder than to use my new technique. I have also used this technique on t-shirts and it works really well there too!

Supplies
Yellow paper folder
Pencil
Practice paper
Tulip Slick Dimensional Fabric Paint: Bright Red, Yellow, Lectric Lime
Small flat paint brush

Instructions


1. On your practice paper trace out your flower, then use the paint to trace over the flower.

2. On the stem use lectric lime, use yellow in the center, and red on the petals. Then take your brush and brush the red petals inward about half an inch.

3. Once you have the technique down trace out your flower on your folder then paint over it. Use your brush embroidery technique on the petals.

4. On the top write your first name and first initial in red. Let dry.

Tuesday, September 7

Boy Backpack


Hey it's me - Cheri from I Am Momma - Hear Me Roar.  Today I'm going to show you how I made this snazzy little backpack for my nephew.  He loves anything that moves - cars, planes, trucks - you name it.


I got this plain backpack on clearance for $6. I wanted to personalize it for him, so I found some images online I liked and printed them off.


If you'd like to use them you can save this jpeg below.

I created a freezer paper stencil for each of the images, ironed them down, and then painted them using Tulip slick paints and Tulip soft paints.  If you haven't tried freezer paper stenciling yet, you must.  It's really fun.  (Click HERE for my video tutorial.)


After removing the stencil I sewed each square onto the back pack with embroidery floss.  (Here's a tip.  Since the patches shift a bit while trying to sew them down you can put a little bit of Aleene's Fabric Fusion under each one to lock it down where you want it and then sew them on.)


Now I hate to discard the inside of the stencil after I've taken the time to cut out the image.  So, I ironed down the leftover stencils to a scrap piece of fabric.


Then I used the Tulip fabric spray paint to spray the whole piece.  Make sure to wait until it's completely dry to remove the stencil.  (This is important since the wet fabric will leak into the stenciled area if you remove the stencil too soon.)


While haven't used this part yet I think they will make really cute patches to sew on other items.


My sister gave it the extra touch by stitching on his name.

Now he's got a one-of-a-kind back he loves and he's set for another year.

Craft on! Click here for today's daily giveaway!

Saturday, August 21

BACK TO SCHOOL: Teacher Gift


Teacher Gift

Designed by Cheryl Ball

Cozy up to creativity with a gift your child’s teacher will use every day! Create this simple craft with colorful felt and Aleene’s® Fabric Fusion™ to turn any disposable coffee cup into one that’s head of the class!

CLICK HERE FOR PRINTABLE DIRECTIONS

See even more back to school projects HERE!

Friday, August 20

BACK TO SCHOOL: Wonky Pencil Holder


Wonky Pencil Holder

A No. 2 pencil may be standard fare for back to school supplies, but “standard” certainly does not describe this pencil holder! A Duncan Oh Four™ Bisque Wonky Vessel is distinguished with Envision™ Glazes for a fun and funky creation.

CLICK HERE FOR PRINTABLE DIRECTIONS

See even more back to school projects HERE!

Thursday, August 19

BACK TO SCHOOL: Haute Lunch


Haute Lunch

Designed by Allee Marderosian

Embellish your lunch gear with Tulip Fashion Design products for a lunch bag that looks über tasty!

CLICK HERE FOR PRINTABLE DIRECTIONS!

See even more back to school projects HERE!

Wednesday, August 18

ILoveToCreate Teen Crafts: Felty Good Pencil Toppers


ILoveToCreate Teen Crafts: Felty Good Pencil Toppers
Copyright Margot Potter

"Mom crafted, kid approved."


I can't believe it's almost back to school time around here! Avalon is excited to get her school supplies together. I love felt, and I always have a pile of felt scraps waiting to be used in projects. This pencil topper idea popped into my head and I'm really happy with how it turned out. Avalon squealed with delight when she saw these. You can, of course, make these uniquely yours using different colors, shapes and embellishments. Googly eyes are always fun! Aleene's Fast Grab Tacky Glue makes quick work of this project.

If you're knee deep in the dog days of summer and the choruses of "I'm bored" have driven you half mad, this is a great project to give your teens so they'll have something to do and something fun to take back to school..

Materials
Aleene's Fast Grab Tacky Glue
Various felt scraps in black, hot pink and white

Tools
Fabric scissors
Small disposable paint brush
Link
1. I cut two different length strips of felt for the base of the toppers. The black strip was 4.5"x1.5" and the black strip was 3 1/4"x 1 1/4" (remember these will be folded in half.) Cut out your shapes for the faces, arrange them on the felt strips to size and plan your designs.

2. Use a thin paintbrush to paint a strip of glue on the inside edges of the felt, fold over and allow to try. The center opening needs to be large enough to slide over a pencil top.


3. Use paintbrush to paint glue on the backside of your shapes and apply to felt. Fingers get sticky fast, so wash between embellishments to prevent fuzzy felt or glue splotches. Allow to dry.

BACK TO SCHOOL: Shoe in


Shoe In

Choose your most comfy blank canvas and create a fabulous work of art! Tulip One-Step Fashion Dye and Tulip Fashion Paint let you indulge your inner artist.

CLICK HERE FOR PRINTABLE DIRECTIONS

See even more back to school projects HERE!

Monday, August 16

BACK TO SCHOOL: Peace Out Backpack


Peace Out Backpack

Designed by Allee Marderosian

Say “peace out” to boring backpacks! Customize yours with Tulip® Express Yourself!™ Iron-On Appliqués™ and Tulip® Glam-It-Up!™ Iron-On Fashion Design™ packs. Add your name with Tulip® 3D Fashion Paint™ and you’re ready to rock the new school year!

CLICK HERE FOR PRINTABLE DIRECTIONS!

See even more back to school projects HERE!

Clicky Web Analytics
Pin It button on image hover

Subscribe to our newsletter

* indicates required
I am interested in products and inspiration for...
Close