I love quirky and cute accessories, and I love how easy it is to personalize them with Tulip Fabric Markers and Fabric Paint. My son is a huge fan of pandas, so he inspired me to add some cute pandas to these inexpensive mary janes.
Showing posts with label shoes. Show all posts
Saturday, March 28
Draw & Paint Panda Shoes
I love quirky and cute accessories, and I love how easy it is to personalize them with Tulip Fabric Markers and Fabric Paint. My son is a huge fan of pandas, so he inspired me to add some cute pandas to these inexpensive mary janes.
Tuesday, January 6
Hand Drawn Oxford Sneakers
You might recall that I have a bit of a "thing" with shoes. I love them and I often window shop for them online. One of my very favorite pair of shoes that weren't DIY are my ASPCA kitty cat Vans. Perhaps I'm just a Vans fan because when I saw these oxford drawn sneakers at We Heart It I was instantly smitten. And when I couldn't find them to buy I went DIY of course!
Tuesday, June 17
Neon Doodle Flower Kicks
There are two projects I remember very, very well from art class as a kid. About 10 minutes into attempting lino block printing in the 6th grade and I was on my way to getting stitches. More fun, was the day we painted pieces of board a wild and whimsical pattern and then covered them with black crayon once dry. The black crayon was scratched away to unveil an awesome, almost tie dyed drawing.
I was hooked and did this many, many times at home. To this day, I remember that as being one of my very favorite art projects that I ever was taught how to do. Today I'm mimicking the look on a pair of neon doodle flower kicks!
Tuesday, May 6
Tuesday, January 21
Neon Kicks
I was a kid in the 80's and one of my very favorite pair of shoes were some neon chucks. My grandmother thought they looked like "the ugliest bowling shoes ever" but I remember them fondly! With the resurgence of neon it seemed the perfect time to recreate those fun, neon kicks!
Thursday, November 7
Easy Beaded Moccasins Tutorial
When I was a kid I wore lots and lots of moccasins and couldn't be more pleased that they're back in style. But when things are "in" they are also often "expensive". I wanted some too cute beaded moccasins but since the price didn't agree with me, I decided to do what I do... I DIYed a pair on the cheap.
Tuesday, September 17
Thunderbolt Shoes

No matter what kind of shoes I buy my boys, they always end up favoring the boat/deck type shoes that they can slip on and off easily. They are great because they are inexpensive and easy to find, but we like to add a personal touch to make them extra fun. My oldest requested red thunderbolts and here's how they turned out.

Labels:
Cheri Heaton,
DIY shoes,
shoes,
Tulip fabric markers
Thursday, September 5
DIY Dyed Ikat Sneakers Tutorial
If you ask me, chevron is kind of on its way out and ikat is ready to take its place as the "in" pattern. Ikat is popping up in fabric, home decor and clothes but I've yet to see any ikat shoes.
Wednesday, June 5
DIY Summertime Swirly Shoes
Hey everyone! It's SUMMERTIME! YAAAAAY! I found these cute kicks on clearance at Target for five bucks. (Score!) I LOVE the color, but since it's summertime I thought I'd make them pop even more by adding yarn swirls and gems.
– Yarn
– Fabric Fusion
– Gem
– Cold Glass of lemonade (recommended!)
Squeeze a quarter sized amount on to shoe. Pinch the end of yarn and apply it to the shoe. Next, simply wrap around in a spiral/swirl. Repeat until you get the look you want. I like the different sizes of circles that I ended up with!
Now add a little drop of glue in the center of each swirl and add a gem. You can do the matchy-matchy thing or add some contrast like I did.
I love my new shoes, they are so cute and are great for the beach or pool side parties! Now, where is that glass of lemonade??
Thanks for reading, I hope you liked my project! For more stuff, check out my Facebook page! http://facebook.com/mayainthemoment
Wednesday, February 20
19 Fabulous Shoe DIYs
We know that shoes are one of the hottest things to craft these days! So we thought we'd pull some of our best DIY shoes projects we've done here on the iLoveToCreate blog over the past few years. There's a little something for everyone, from the classic Chuck Taylor to the ever-so-popular glitter shoe! Wahoo! Check out these fab kicks.
From top left:
Glitter Polka Dot Heels by Pattiewack
Rainbow Glitter Toms by Lauri Eaton
Glittered Dorothy Shoes by Crafty Chica
Toms shoe makeover by Cheri Heaton
Fabric Scrap Shoes by Jennifer Perkins
Superhero Winged Shoes by Cheri Heaton
Splatted Blue Suede Heel Revamp by Pattiewack
Pretty Payless Shoe DIY by Lauren Binci
Glitter-Toed flats by Cheri Heaton
Zipper Shoes by Pattiewack
Aww Shucks you Painted me Chucks by Jennifer Perkins
Make your own DIY Glitter Shoes by Allee Marderosian
Electric Blue Suede Shoes by Pattiewack
Glitter-Toed flats by Cheri Heaton
Zipper Shoes by Pattiewack
Aww Shucks you Painted me Chucks by Jennifer Perkins
Make your own DIY Glitter Shoes by Allee Marderosian
Electric Blue Suede Shoes by Pattiewack
Wally the Whale Summer Boat Shoes by Jennifer Perkins
Super Star Sneakers by Avalon Potter
Crystal Studded Stilettos by Pattie Wilkinson
Click here to see more inspiring shoe projects on iLoveToCreate.com!
![]() |
Tuesday, February 12
Converse Shoe Makeover
I have two boys, but I'm now expecting a little girl. I've been looking through my boys' old clothing and shoes to see what I can convert to girl clothing for the baby. These little red converse sneakers have been through a few boys in the family. I decided to try and "girlify" them for the baby so she can wear them one day too. It was a quick, easy project.
I started by removing the old laces and scrubbing the toes to get them a little cleaner.
Then I got out my Tulip Glitter Bond and some Tulip glitter.
I used a little sponge to apply the glitter bond.
Then I shook on the glitter. I pressed it on with my fingers and shook off the excess. I used my fingernail to make sure the edge was really clean along the black line. The glitter covered the dirty toe really well.
I added some ribbon I already had for laces and called them done. If you're wondering how well the glitter will stay on, I can attest that it stays on really well. I made THESE SHOES a long time ago and they held up really well. (If you scuff your toes a lot them you could always reapply some extra glitter if necessary.)
And there you have it - from dirty, worn out boy shoes to clean, cute girly ones. Thanks for stopping by.
Labels:
Cheri Heaton,
shoes,
tulip glitter,
Tulip glitter bond
Tuesday, January 3
TOMS Shoe Makeover
Many, many months ago my mother-in-law bought me some Toms. I was so excited and I wore them a whole lot. I wore them enough to get a hole in the front of them.
So I gathered some supplies to fix the problem. I happened to have some coordinating fabric in my scrap bin. I pulled out Aleene's Fabric Fusion Peel and Stick Sheets, which were PERFECT for this project.
Here's what they look like now.....
Here's how it went down. I love dry adhesives because there is NO mess. There's no wet glue seeping through the fabric. It's simple and clean. There are several sheets in the pack. They come with the adhesive sandwiched between two pieces of white paper.
I peeled one side off and applied it to the shoe, lining it up with the long seam across the top of the shoe.
Then I smoothed it over the front middle and then along the sides. Naturally, you'll need to pleat it where the pleats are in the shoes. Then just trim the paper to match the shoe.
The sheet didn't cover the entire front, to I added a few more pieces until the whole front area was covered.
Once you've got the paper everywhere you can smooth it over the shoe to get the adhesive to adhere and the just peel off the paper. Now it looks like this.
Then applied the fabric the exact same way. You could apply a little fray check around the bottom, but if you got the adhesive all the way to the bottom I don't think you'll have to worry much about fraying. It's stuck on quite well.
I added a little extra adhesive inside the pleats to get them to stay flat.
I smoothed the fabric over to get it really stuck on there - especially at the bottom. I didn't like the raw edge of the fabric across the top of the shoe so I decided to add a little bit of lace. I used the dry adhesive again, cutting it into thin lines and then I laid the lace over it.
And BAM. They're done. No waiting until they are dry because they already are!
And it's kind of fun to have a pair that's totally unique.
Visit us on Facebook!
Craft on!
Craft on!
Tuesday, July 19
Superhero Winged Shoes
I have two little boys and they are huge superhero fans. A few months ago one of my kind blog readers shared THIS LINK with me. I thought it was an awesome idea so I decided to whip some superhero wings up for my boys. They were easy and fast to make. (My version requires no sewing.)
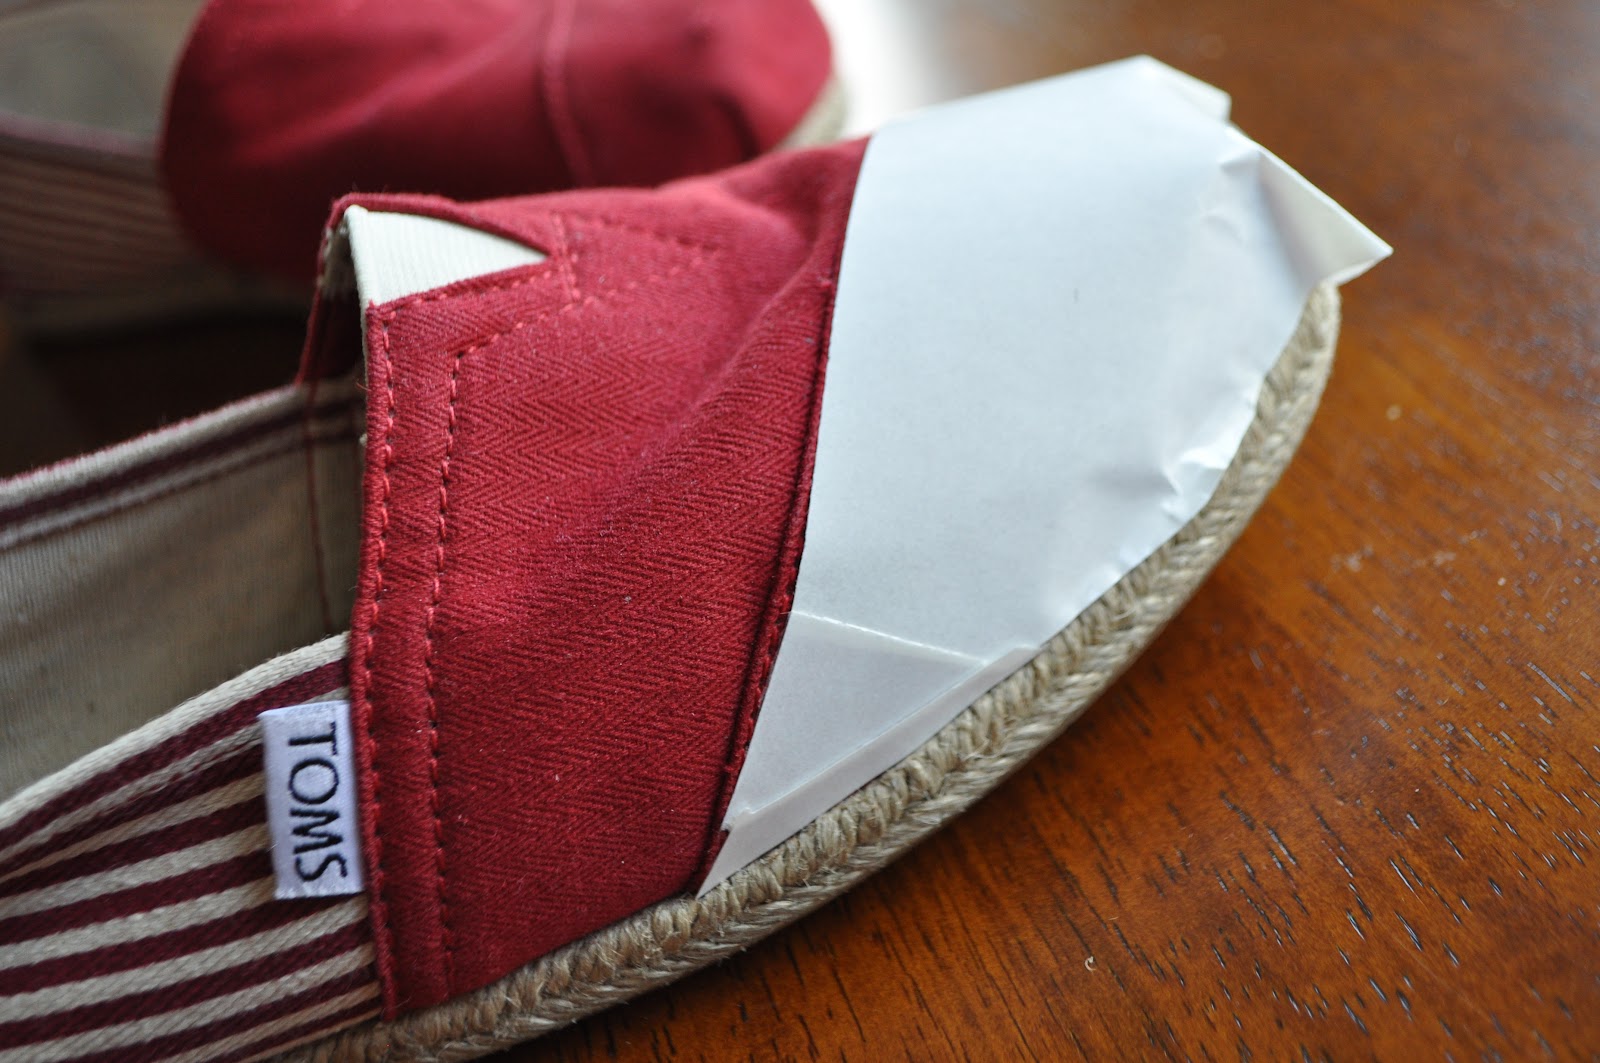
Okay, here's what I did. I pulled out a pair of shoes and held some paper against them to sketch a pattern.
Then I used my pattern to cut out two wings from felt. It's not the regular, floppy felt. It's the really stiff kind that you can find next to the 99 cent sheets of felt in craft stores.
Next I used this super cool Tulip product. It's a glitter transfer sheet. It allows you to have the glittered look without the giant mess. It rocks and I was excited to find a way to use it for my boys.
It has a clear protective sheet on top. I traced my pattern onto it, but I cut the glitter piece a bit smaller so there would be a felt border showing around the edges. I also cut the slits in the wings a bit deeper on the glitter sheet.
Next I peeled off the clear layer, places a cloth over it, and ironed it on. Easy peasy.
I used a paper punch to create the holes for the laces.
All that's left to do is lace them up!
And....Bam! Wham! Pow! You have shoes fit for a super hero.
Thanks for reading.
Craft on! Click here for today's daily giveaway!
Subscribe to:
Posts (Atom)